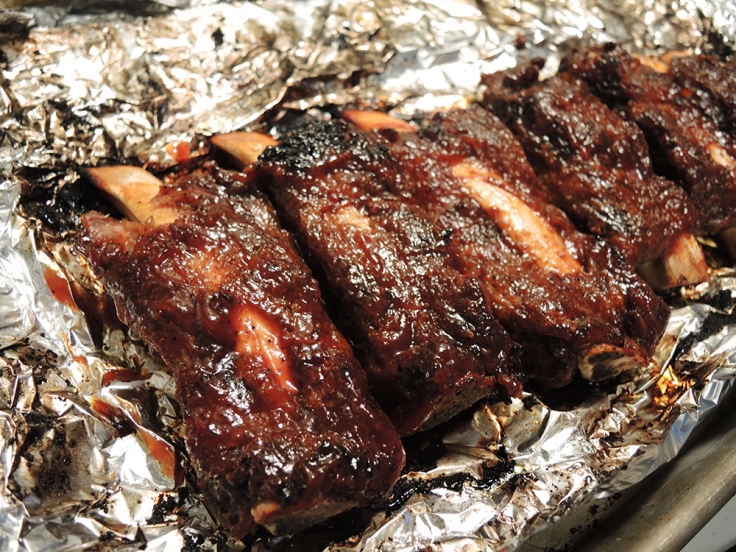
It’s the summer (or the winter!) and you don’t have a grill or a smoker. What do you do? Sit there and lament your grill-less state? No! You buy some ribs, turn on that oven, and make some fall off the bone beef ribs!
The funny thing about “fall-off-the-bone ribs” is that according to rib competitions and the awarded winners, you actually don’t want a rib to fall off the bone. You want tug-off-the-bone. It’s probably because of the idea that you should be able to eat a great rib with your hands and if it fell off the bone right when you picked it up, then that wouldn’t provide the right texture. You also get more meat flavor and less rendered fat flavor when the rib stays intact.
Nonetheless, most lay people who want that tender rib experience just call it “fall off the bone.” If you love fall-off-the-bone ribs that leave a clean bone, but that won’t disintegrate when picked up by hand, then these ribs are for you.
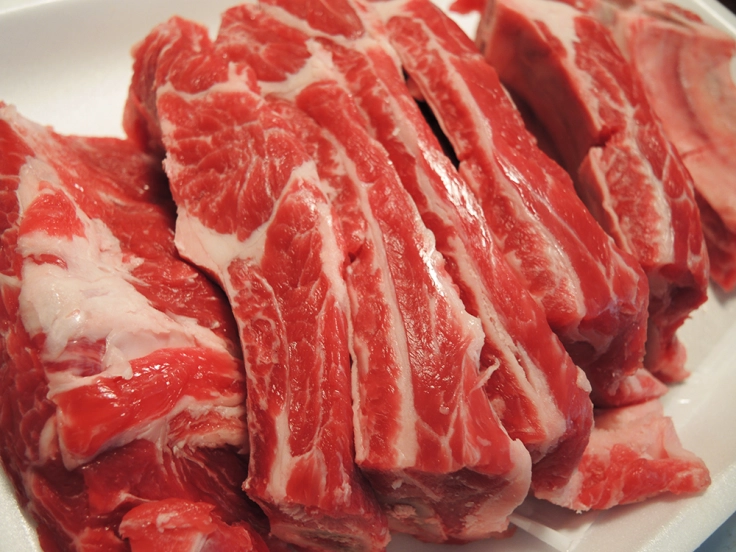
I couldn’t believe my taste buds or my eyes when I saw the final product of these ribs. They smelled and tasted like they were smoked or grilled. I don’t want to overstate it because of course you’ll get more smoky flavor from a smoker, but these are a great alternative for easy ribs at home. In the recipe I used back-ribs, but this recipe will work for any beef ribs. For my equally popular baby back pork ribs recipe, click here and if you’re looking for a barbecue sauce that complements these ribs perfectly, try my homemade barbecue sauce recipe.
Recipes for Complementary Side Dishes
- Chipotle Pinto Beans
- Fried Okra
- Collard Greens with Bacon
- Potato Salad
- Dill Summer Salad
- Buttermilk Cornbread
- Sweet and Spicy BBQ Sauce
- Carolina Vinegar Style BBQ Sauce
Makes about seven ribs at 405 calories per 4 oz. of meat.
Dry Rubbed Fall-Off-The-Bone Beef Ribs in the Oven
Dry rubbed and sauced fall of the bone beef ribs made in the oven.
Ingredients
- 2.5 pounds of beef ribs either pre-cut or whole (about 3700 cal.)
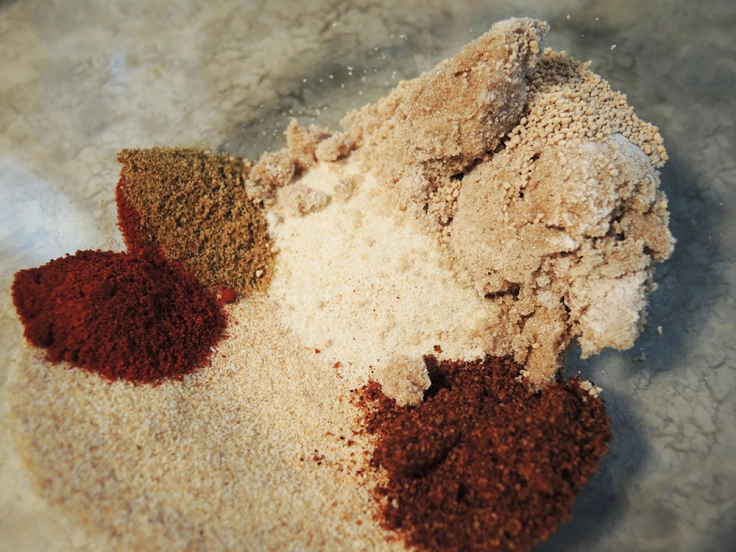
- 1 tablespoon onion powder
- 1 tablespoon garlic powder
- 2 tablespoons brown sugar (90 cal.)
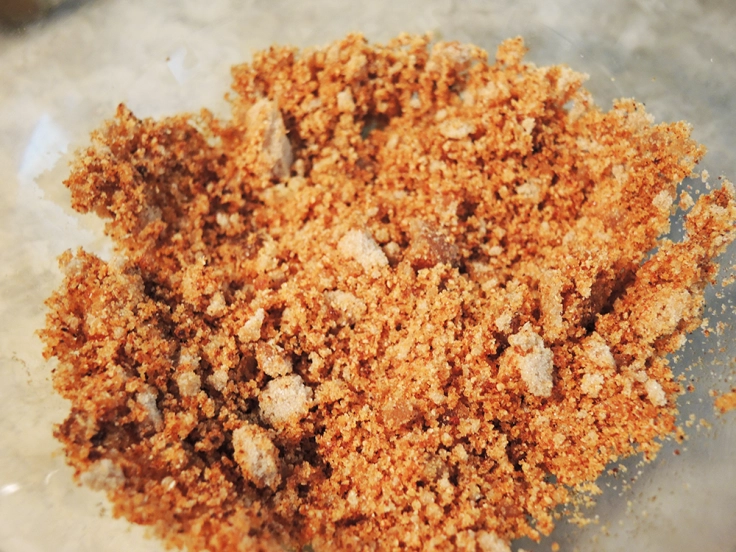
- 1 tablespoon oil (120 cal.)
- 1/2 teaspoon cumin
- 1/2 teaspoon salt
- 1 teaspoon chili powder
- 1 teaspoon smoked paprika
- About 2 tablespoons your favorite BBQ sauce (about 70 cal.)
Equipment
- Large baking sheet
- Aluminum foil
- Ziploc bag or large air-tight container
- Basting or pastry brush
- Spoon
- Optional: latex gloves
Directions
- Optional Step: Remove the silverskin on the underside of the ribs. This can be a huge pain and it isn’t imperative for these ribs to turn out well, but it does let the dry rub get to the meat on the underside of the ribs. Do this by using a sharp knife to get underneath the connective tissue sitting just on top of a bone on the underside of the ribs. Once you have a flap, use your hands (or a paper towel if it’s too slippery) to pull it off. Repeat the process as necessary. Don’t go overboard so that you don’t damage the meat.
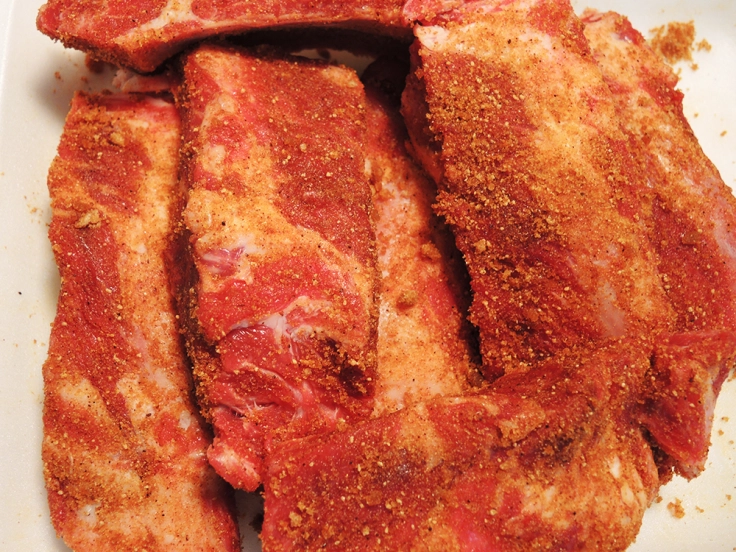
- Put all of the spices in a bowl.
- Add in the oil and then mix the ingredients together very well until they form a crumbly paste.
- Apply the spice mixture liberally to the beef ribs and cover each side of the ribs. Use all of the spice mixture.
- Place the spice covered ribs into a ziploc bag or an air-tight container and leave them outside of the fridge for 1 – 2 hours to marinate for same day preparation or overnight in the fridge for next day preparation.

- After 1 hour get the oven pre-heated to 250 or 265 degrees F (I used 250, but it will depend on your oven).
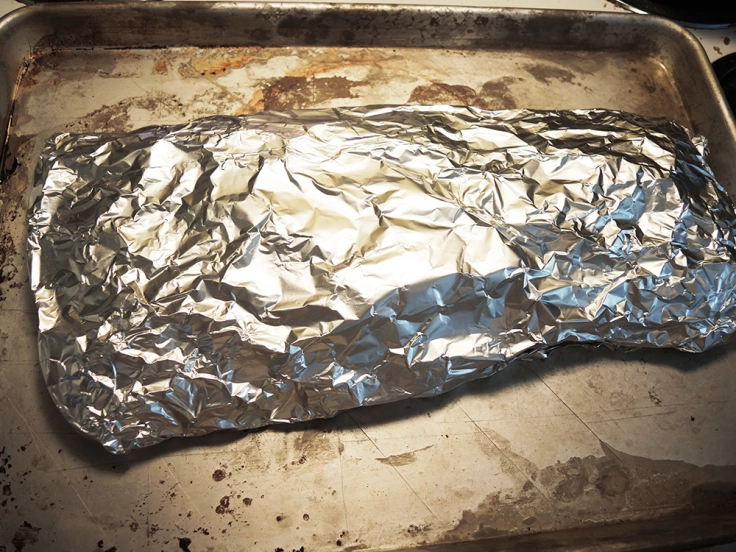
- Put a large sheet of aluminum foil over a large baking sheet and then place the beef ribs on the foil.
- Wrap the ribs up in the foil by either using another sheet or folding the sheet you already have down. You want to create a sealed pouch for the ribs to sit in. Make sure not to pile the ribs on top of one another.
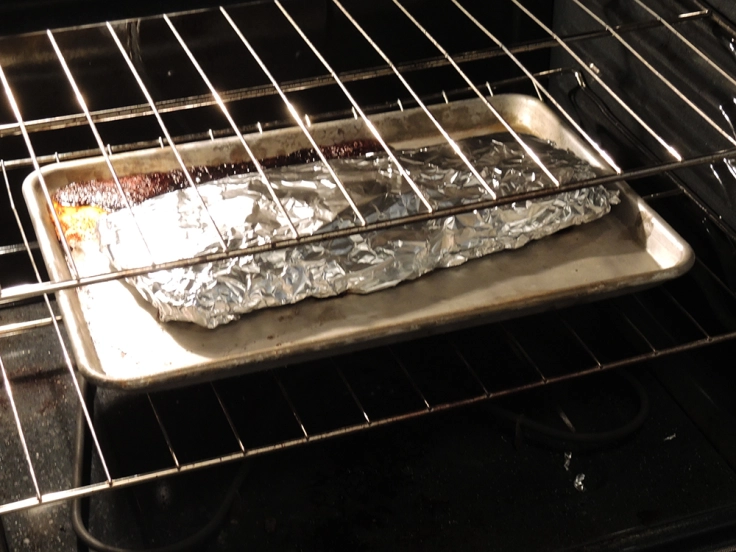
- Put the ribs into the oven on the middle rack, close the oven door, and forget about the ribs for 3 – 4 hours (I went 3.5 hours before pulling them out of the oven).
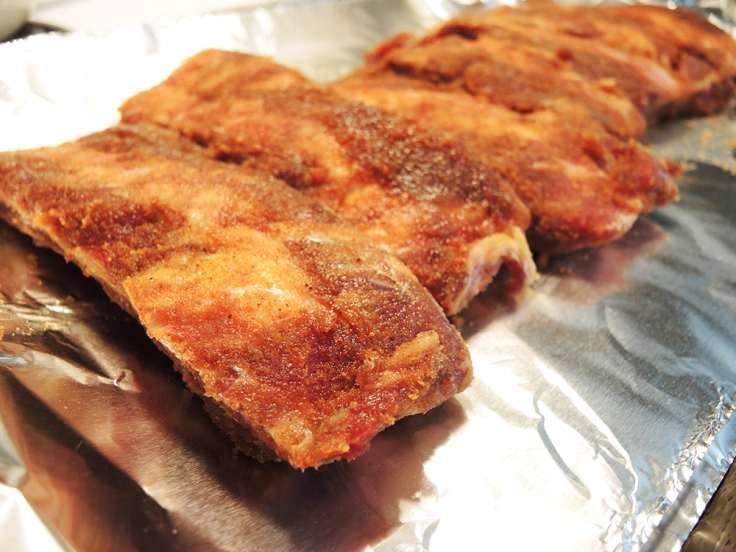
- After 3 – 4 hours, take the ribs out of the oven open up the pouch and see how the ribs are doing. They won’t look right at first, but you will notice that they are already fall-off-the-bone tender.

- At this point set the oven to broil on the high setting. When the broiler gets hot, place the ribs under the broiler on the middle rack for 5 minutes. The ribs will take on some more color and get a crispier texture on the outside. Be careful and watch the ribs the entire time. The fat from the ribs that ends up on the foil can sometimes catch fire under high heat. Simply remove the ribs, and get rid of areas that may be catching fire and return to the broiler.

- You can now eat the ribs, but I highly recommend taking some of your favorite barbecue sauce (try my own recipe that goes extremely well with these ribs by clicking here) and brushing about 2 tablespoons lightly over all of the ribs. You can use a basting/pastry brush. Apply as little or as much as you want, but this last step is where you get the barbecue flavor. I don’t recommend baking/broiling with the barbecue sauce because it will burn really easily.
- If the ribs were all connected as one rack, you can now cut up the ribs using a large butcher knife before serving. Otherwise, just tear off pieces and enjoy.
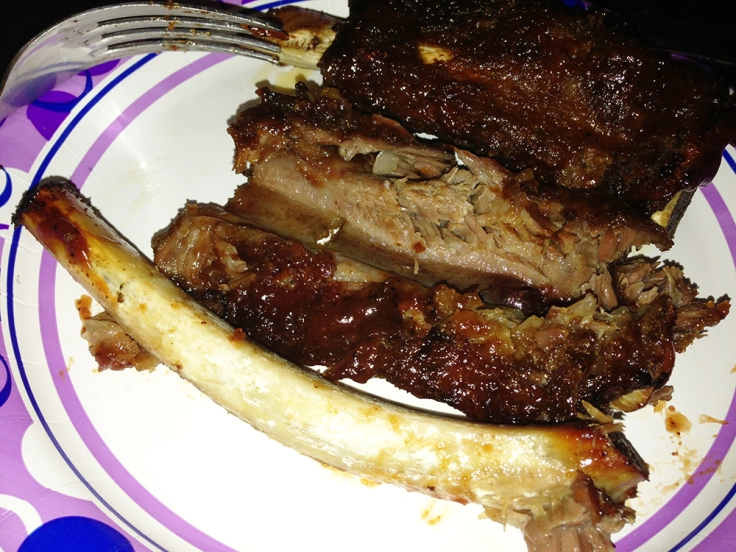
- Serve and eat immediately. Be careful moving them around because these ribs really do fall off the bone. In the picture below, I just lightly pushed the meat off of the bone using a fork.


_______________________________
Please Support Home Is A Kitchen!
No spam. Just real updates on recipes, restaurant reviews, travel, and free giveaways!
![]()
![]()
![]()
![]()
_______________________________

I have been cooking ribs for the past 10 years, and this is the first time I read such an easy to follow recipe and simple ingredients list. No mess, no fuss. I made these ribs last night for my husband and serve them with smashed potatoes; I started eating them right away. They were delicious . The key is to cook them in the foil pouch. That made a BIG difference. Thank you so much.
I really appreciate that, Reina! Great idea pairing the ribs with smashed potatoes. Thanks for stopping by!
With no grill and the finnicky weather of the northwest, your recipe is just what the doctor ordered! I’ve made these ribs a few times now, and my family loves them more and more every time! Thank you SO MUCH for this lip smackin’ recipe!
Thanks for trying it! So glad you enjoyed it over and over again!
Hi just want know the brand of beef ribs you used to this recipe. Thanks and more power
Hi Edgar. I don’t use any particular brand. Just find a grocery store or butcher shop you trust and get ribs from there. Basically wherever you buy meat should be fine.
Have made these twice now. Don’t have a grill or smoker at my apartment that I can use all day without upsetting other tenants so this is perfect. Some of the best and simplest ribs ever. I prefer to trim the silver skin while the ribs are slightly frozen, it seems to make it easier to trim it away without losing too much meat. The spice rub is PERFECT. Thanks!
Thanks for the kind words, Tyler! I’m glad you enjoyed the recipe numerous times!
Are you using back ribs or side ribs? I reread the recipe but didn’t see the distinction. Thanks
Hi Jennifer, this recipe used back ribs, but I believe you can use either and get good results.
Thank you. One more question. Instead of wrapping ribs individually with foil, could I put in aluminum foil roasting pan and cover / seal with foil around the rim? I have 8lbs of ribs.
I’m not sure. I’ve never tried it that way. It might work, but the idea behind the pouches is that they sort of braise in their own liquid. In a roasting pan, it could work so long as you’re not stacking the ribs on top of one another and they are one layer on the bottom.
My ribs are in the oven. They smell is so enticing. I just know from the recipe you provided that this will be a keeper. I have tried so many others…love the rub…just know it will be tasty….will let you know.
I’m excited for you to try them! Thanks for stopping by.
I love the way you broke it down so simple step by step. I read recipes for fun. I’ve been cooking for many years and its hard for me to follow recipes because I end up doing my own thing. I suffer from ADHD and anxiety but cooking calms me. This was a pleasant read. And I bet they turned out great. The pictures made my mouth water
Hi Alonda! Thanks so much for sharing your thoughts and I’m really happy that the step by step approach of the blog appealed to you. I try and do that for all of my recipes including pictures so you can see what I’m talking about as well as read it. I agree with you that something about cooking is very comforting.
Ok, Just bought ribs today and this is the most enticing recipe i have read yet!
I am definitely trying this tomorrow for dinner.
Good luck, Alli! Please let me know how they turn out!
I have to agree with Reina about the, “no muss, no fuss”.I left rub on overnight and followed cooking times exactly. These ribs turned out perfect!!! Can’t wait to make them for my Dad’s late Birthday dinner next week.(Ribs are his favourite). Thank you so much for this recipe!
Wow. Just tried your recipe and the ribs turned out so good! My husband said he will be requesting these again. Thanks!
That’s great, Elizabeth! I’m happy you and your husband enjoyed them.
Gonna try it next weekend!
OMG!! I have tried for the last 3 years to find an oven baked rib recipe! We not big grillers, so….
I am in LOVE!! Also, out of all of the online recipes that I have tried, this is the first one worthy of a review! I am drooling!
Thank you, Wendy! I appreciate the kind words and that you took the time to share your thoughts about the recipe. Enjoy!
I’ve made these ribs twice and they were a hit both times. All the fat renders out and they have a texture similar to the best need brisket you can imagine. The only change I made was adding a little cayenne and crushed red pepper to the spice mix for an extra kick
*best beef brisket lol
I love the added cayenne for heat, Chuckster! Good call. I personally always add a little myself because I love a little spice, but not everyone does.
Hey Sef, just want to say thank you for this amazing recipe. I’ve made this for our family weekend lunch. It was a success! Family members are asking for second serving (good thing there’s enough). First time for me to try cooking ribs using dry rub. Will definitely print your recipe, coz sometimes food blogs suddenly disappear 🙂
Thanks, Mickey! It’s wonderful that you’ve made your family so happy and I’m glad my recipe could help. Hopefully, the blog won’t disappear suddenly either!
I have a package of boneless beef ribs in the freezer. Do you think your recipe will work for those without any changes? Not long ago I tried using boneless ribs in a recipe meant for ribs on the bone, and they ended up overdone. Yours look fabulous!
Hi, Maureen. You can definitely use boneless beef ribs for this recipe. They probably won’t be quite as tender as the bone in version, but this should work just fine. Please let me know how they turn out!
Thanks so much for the quick reply! I’ll definitely try it out and report back on the results.
I’m way overdue reporting on how my boneless ribs turned out. They were delicious! I don’t have a bone-in result to compare them to, but no complaints about these at all. I think they might come out even more tender if next time I put a a little bit of water in the pouch to steam them, but these were just wonderful as is. Thanks for the excellent recipe!
I’m way overdue reporting on how my boneless ribs turned out. They were delicious! I don’t have a bone-in result to compare them to, but no complaints about these at all. I think they might come out even more tender if next time I put a a little bit of water in the pouch to steam them, but these were just wonderful as is. Thanks for the excellent recipe!
You’re welcome, Maureen! Thanks for reporting back!
You’re welcome, Maureen! Thanks for reporting back!
This recipe is absolutely amazing. These ribs are fantastic. Defifnitely recommend.
Thanks, David!
Horrible recipe.
You should delete this recipe immediately. Totally a waste of good meat.
Sorry you feel that way, Todd. Thanks for sharing. Most people seem to like the recipe, so I’m curious what specifically you didn’t care for. Maybe you prepared it incorrectly or maybe it’s just not your preference to have ribs that are prepared indoors without a smoker. That’s fine and you’re welcome to your opinion. I won’t delete the recipe though!
The best recipe ever! Broiled them at the end with Sweet baby ray’s sauce Delicious!
Glad you enjoyed the recipe, Dianne!
This is my first time to make ribs and it turned out great! I wish I could post a picture of my ribs. It was that simple. I thought I was missing a step. I only cook the ribs for three and a half hours but it turned out great.
That’s great, William! 3.5 hours works too!
Thank you for this rub recipe! I made beef back ribs for dinner tonight (just finished eating, actually), and they were easy and so delicious! Because I’m in the middle of a Whole 30, I substituted 2 large dates for the brown sugar, chopped them as finely as I could, and used my immersion blender to combine them with the other spices. The texture was more paste-like going on the meat, but the dates provided the sweetness, and I didn’t miss the sugar. This is definitely staying in my list of go-to recipes, and I look forward to trying it with the brown sugar to compare! 🙂
Really happy you enjoyed it, Bobbi! Thanks for the kind words and I’m impressed with the ingenuity of swapping the brown sugar for dates. Very creative!
Loved the step by step easy to follow recipe! Cooking the ribs in my oven right now! Can’t wait to try them out. This was also a great find as this is my first time making ribs!
Thanks, Meigan! I hope they turn out well for you! Please let me know how it goes.
Eating them right now and they are delicious! Made a slight change of using a different sauce instead of BBQ, I’m not a huge BBQ sauce person but the dry rub flavor is great! My boyfriend likes it so definitely a meal we will repeat and enjoy! Paired it with some Brussels sprouts cooked in bacon grease and cheesy broccoli spirals.
This is by far the best rib recipe I have ever tried. I have been using this recipe for pork and beef ribs. Turns out great and the only change I make is adding more bbq sauce. Thank you!!
What kind of oil do you use for the recipe?
Hi Nadia. The oil doesn’t really matter. I used a neutral oil like vegetable or canola oil. You don’t have to use oil, but it just helps to make the spice rub into a paste that’s easier to stick on the ribs. It’s not meant for flavor or anything.
Going to try your recipe. I have foil smoker bags. They are great for adding smoke flavor. They have small wood chips in the walls of the foil bags. Perfect for the oven
Hi Jan! I hope you enjoy them. I’ve never heard of foil smoker bags that can be used indoors! That’s great if they work. Can you share a link to the product? I’d love to know about them!
I’m eating these right now!! There is no reason to EVER go out for ribs again. This is my first time making ribs in over 10 years. The bones are literally clean–because the meat fell off–just like you said. The taste is incredible. I made your bbq sauce too, nice and spicy!
I’m happy you enjoyed them! Thanks for stopping by and trying the recipe, Monique!
Man fuel got 4 slabs of beef ribs (4 bone slab) my question is did you remove the fat on top of the ribs like some recipes call for that I’ve seen, and this will be the first time done beef ribs too.
Hey Brian! I usually get my ribs already trimmed, so I’m not sure how much fat you’re talking about. Are you using beef back ribs or short ribs? I know short ribs often have a fat cap that some people might trim or just leave if it’s not too thick because it adds flavor. If you’re making short ribs, this recipe isn’t quite designed for that, but you could trim some of the fat to make them a little more similar to back ribs.
WOWSER! This was the 1st time I have tried to make beef ribs in decades as my first two attempts were not good at all. After that, I always made pork ribs. My hubby surprised me and brought home some ribs to cook for dinner. I immediately got on pinterest and I liked your easy recipe. Quick, easy and OMGOSH, these were delicious beyond belief! Definitely a fabulous addition to my list of dinner dishes. THANK YOU!!
You’re welcome and my pleasure! Thanks for taking a chance on this recipe.
I am excited to try your rub today. I realized you said this is not really a short rib recipe but that’s what I was/am making. I have uncut short ribs because we like to make them like the Dino ribs you get at the smoke house restaurants. I’m a fan of smoking but won’t do it in the winter, so I often slow cook a lot in the oven, it also helps keep the house warm because we heat with wood. I’ve taken your suggestions on cutting off some/most of the fat. I used your exact ingredients with the measurements. It drives me crazy when people say ” oh I used your recipe but added this this and this” lol I just want to scream then it’s not my recipe. My mom taught me to always make something exact the first time then the next time you could tweak it. I really like your idea of mixing the dry ingredients with oil that did wrk well and will definitely use that again. Not sure why I never thought of it before but either way thanks. The ribs are marinating now. Will post an update after, though I’m pretty sure they will be great. I could tell by the smell of the rub. So thank you in advance.
Sounds great, Gloria! I appreciate the kind words and the commitment to sticking to the recipe. I agree that it’s good to follow the recipe once and tweak later. Please do update me because I’m sure people would like to hear how using short ribs turned out! Dino ribs sound so good!
Omgoodness…my family and I LOVED it, this is now my new way to do ribs.
The only problem I had was not buying enough ribs for leftovers!!
GREAT RECIPE!!
Thanks so much! Glad you enjoyed them!
I have 4.5 lbs should I keep them in the oven longer than 4 hours?
Hi Zack, I would stick to 4 hours as long as you keep the ribs in separate pouches. For example, roughly 2 pounds per pouch. 4 hours should still work alright. I sometimes pull the ribs at 3 or 3.5 hours if I want them a little firmer, so I think 4 will still work. Worst case scenario, just check one of the pouches and see if the meat is tender to your liking. If not, close it up and let them ride another 30 minutes or so.
Loved the recipe. It was very difficult to spread the rub on – with or without gloves!
Hi Christina! Glad you loved the recipe and I’m sorry it seems hard to get the rub on. If using the oil to make a paste doesn’t work well for you, you could always just try applying the dry spices directly to the meat. Some will fall off, of course, but plenty will stick. Thanks for stopping by and sharing your thoughts!
These ribs sound wonderful.
Can they be frozen once cooked.
Hi Carol, you could freeze them once cooked, but they won’t be quite as good as when they were fresh. I would recommend reheating them in the oven with a little broth or water so that the meat doesn’t dry out.
Could they be freeze after marinating?
Yes, you could freeze them after marinating, but you should use a vacuum sealer so you don’t get any freezer burn. You may also notice that the dry rub loses some of its flavor after freezing, so you might want to use a little more initially or add some more after thawing.
Hello, do I keep the oven on 265 the who 3 to 4 hours?
Hi Angie! Yes, you keep the oven set to 250 F (or up to 265) the entire time the ribs are in there. The only time you would change the temp is to broil the ribs at the end.
Can this be done in a slow cooker instead of the oven?
Hi there! I’ve never done this in a slow cooker and I wouldn’t really recommend it. The slow cooker would yield fall off the bone ribs, but they would be mushy. This recipe makes ribs you can hold and that come off the bone easily when you bite into them. If you did try these in a slow cooker, you’d need to add a 1/4 cup of broth or water and I wouldn’t go longer than 6 hours. You probably wouldn’t be able to broil them to get them a little crispy at the end because they might be too tender. If you do try this with a slow cooker, I’d love to hear how it went!
Tried this today – exactly as described. It tasted as good as it looked and we ate till we had to roll away from the table. This one is a keeper for sure. Thank you!
I’m glad you and your companions enjoyed the recipe! Thanks for sharing your experience!
I’ve done a number of variations of rub mixes using this basic recipe which will always provide excellent eating satisfaction. This method is often used in restaurant kitchens because it always keeps the meat moist and can be used to speed up the cooking process as well. Tonight, it’s Texmex. A cayenne and chilli flake rub with a jalapeno BBQ sauce. Grab a big glass of water!
That’s nice if you to say, David! Thanks for sharing and I hope the TexMex delivers some kick to the recipe!
I have never made beef ribs before. The ones I have are pretty thick. Should I be worried about them cooking all the way through at the allotted bake time in the recipe?
I’m not sure how thick the ones you have are, but I’m fairly confident they will be cooked through after 4 hours. If you’d like to take a photo of the ribs and email it to me, feel free to do so! You can find contact info on the About page: homeisakitchen.com/about
You can defrost frozen meat very quickly by putting them in a Ziploc bag, press the air out, submerge them in a bowl of cold water and run a trickle of cold water over them. You may have to set something on them to keep them submerged. I’ll bet it will only take 20-30 minutes to defrost. Maybe less.
I made these at Christmas and they were a HIT! I’m wondering if I can adapt this to chicken thighs as well? Can I do the same thing with the thighs for the same amount of time? Or would that be different timing?
Hi Sharon.! So glad you enjoyed the recipe. I wouldn’t do this with chicken thighs though. If you like the flavor of the rub, then you could use that, but chicken thighs cook much faster and easier than ribs while still remaining very tender. Were you thinking of boneless or bone-in thighs? I would recommend grilling, pan searing, or even roasting in the oven for boneless or roasting for bone in. If you’d like to get a sense of roasting boneless thighs then check out my smoky chicken sliders recipe. Just use it as a reference for cooking method and times. If you’d like to try bone in chicken thighs, you can check out the Greek Style Roasted Chicken recipe I have just for some guidance. Hope that helps!
I see! Ok I’m
Using bone in. I did search your recipes specifically looking for bbq chicken, but did see the other chicken recipes you mentioned in your reply, so I will go back and check those out now. Think about doing a whole recipe on BBQ chicken though, your beef rib recipe is the best I’ve had, and feel really happy about being able to do it myself now, as finding beef ribs is difficult in the restaurants, it’s always pork. Thank you thank you!
Thanks for the kind words! I’ll try and come up with a bbq chicken recipe that doesn’t use a smoker. A couple of tips I’ll give you with bone in chicken thighs. They can take a little while to cook through so just make sure to check the temp inside (should be 165 F). If you do use the rub from the ribs, keep an eye on the chicken while roasting just to make sure the sugar in the rub doesn’t burn.
I made your dry rub recipe and then realized I had pork ribs! I used the rub anyway and added some Baby Ray’s BBQ sauce after cooking the ribs for 3.5 hours. My family loved them. These ribs were so delicious.
That’s so great, Pamela! So happy you enjoyed them and yes, the recipe works for pork ribs as well! I even have a version using baby back ribs. Thanks for stopping by and sharing!
I made the recipe and finished them off on the barbecue. They were excellent and I will be making them again. My granddaughter who lives with me loved them as well and her Dad is a very accomplished “smoker”. So that is high praise indeed. We purchased our ribs at Costco. There were seven in the package and we only ate four of them so we have leftovers for tomorrow. Thanks for sharing.
I’m very happy you enjoyed the recipe, Linda! Thanks for stopping by and sharing.
If I’m uninterested in braising the ribs, can I enjoy them as they are after they’re done baking? Also, rather than baking them while wrapped in the foil, can I let the ribs cook in a covered aluminum pan with a little beef broth and achieve similar results?
Hi Bre! This whole process is sort of braising the ribs in their own liquid. So when you say you are uninterested in braising, did you mean broiling? If you don’t want to broil them you can eat them right away as they are or with some bbq sauce. The only difference is that they won’t form any sort of crust or variance in texture on top. Any bbq ribs you eat out in the world will have a “crispier” texture on the outside from the bark created through smoking or even grilling. That’s what the broiling is for in this recipe. If you don’t like that texture, then sure you can eat the ribs right away. They’ll taste fine. As for an aluminum pan with a lid, you can definitely try and it will probably work. I wouldn’t add much beef broth though. Just a little will go a long way because the ribs will also shed water. Hope that helps!
This has been my go to rib recipe for the last 6 years it is always perfect every time and everyone raves about them! Thank you for making me the ribs queen!!
Thanks for the kind words! Glad you enjoyed the recipe!
I have been making these monthly for the last couple of years. They are always a hit. I don’t use the sugar because I prefer my savory food to stay savory. And I now wrap only 2 ribs together at a time because they really are impacted by touching each other! So I make a bunch of little aluminum pouches. Usually I just wrap them and leave them to sit with the spices overnight and then they can go right into the oven!
Awesome, Elana! Nice modification and I like the idea of marinating in the foil as a time saver!
I made these for years and my family just loves it. My husband is a smoker guy but he can’t get enough of this. I want to know if I marinaded too many can I freeze it for later
I like the way you write the steps to this rib recipe. You make steps easy for the most inexperienced cook. I am an old cook, and know about tin foil pouches and making rubs and letting meat sit before putting in the oven. I like how you spelled out those steps for someone who may have never done it before.
I also like your BBQ sauce recipe and will try it when I do my beef ribs.
Thank you Margo! Much appreciated!