My recipe for fall-off-the-bone beef ribs has been so successful on this blog that I thought I’d go ahead and take a crack at making baby back ribs using the same oven technique. The benefits to using an oven are that you can make these ribs any time of the year and the oven regulates the temperature, which is often the trickiest part to grilling and barbecuing.
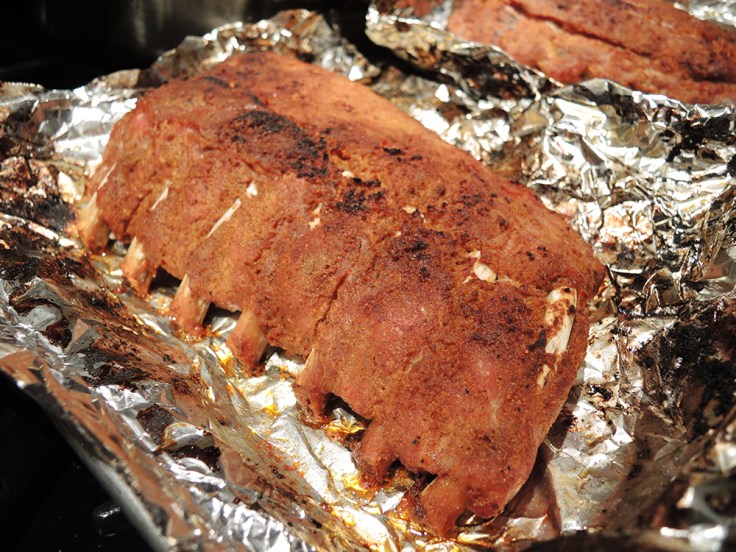
This time around the results were mind blowing if I do say so myself. Not only did the pork ribs turn out perfectly, but I think they’re even better than the beef ribs. They came out so tender that a mere tug removed the meat from the bone. What truly blew me away was how well the smoky-sweet dry rub marinade (combined with a light basting of barbecue sauce at the end) made these comparable to restaurant quality.
The only thing that would make these ribs better would be to smoke them for an hour before tossing them in the oven to finish them off. I’m very proud of this recipe and I would be surprised if other rib lovers don’t enjoy this as much as I do.
Recipes for Complimentary Side Dishes
- Chipotle Pinto Beans
- Fried Okra
- Collard Greens with Bacon
- Potato Salad
- Dill Summer Salad
- Buttermilk Cornbread
- Sweet and Spicy BBQ Sauce
- Carolina Vinegar Style BBQ Sauce
Fall-Off-The-Bone Baby Back Ribs in the Oven
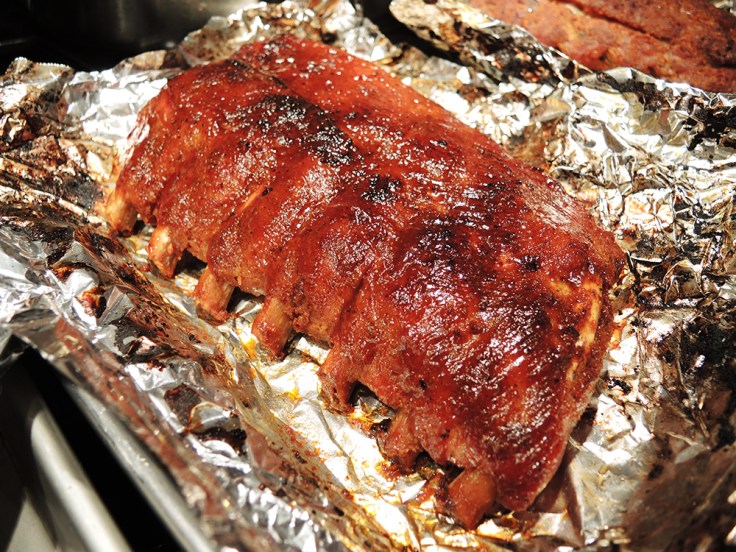
Clean off the bone, dry rubbed, and sauced baby back ribs.
Ingredients
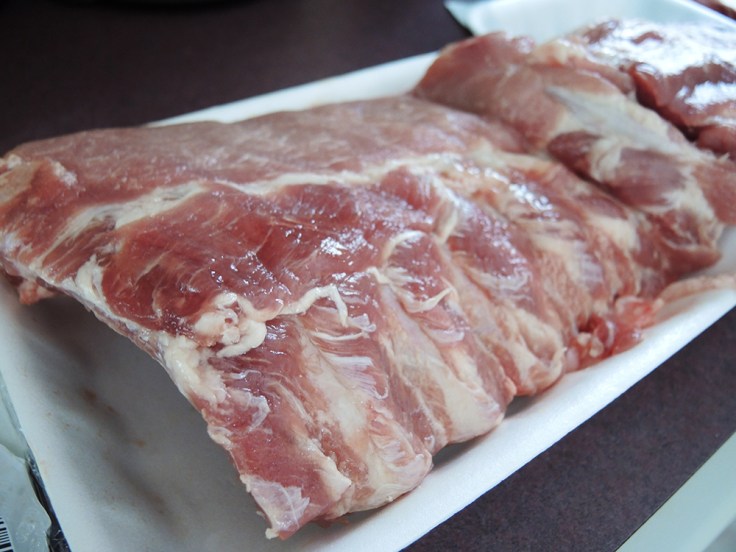
- One full rack (about 3 pounds) of bone-in baby back ribs
- 2 tablespoons onion powder
- 2 tablespoons garlic powder
- 4 tablespoons brown sugar
- 2 tablespoon oil
- 1 teaspoon cumin
- 1 teaspoon salt
- 2 teaspoons chili powder
- 2 teaspoons smoked paprika
- 1/4 teaspoon black pepper
- 2 tablespoons your favorite BBQ sauce
Equipment:
- Oven
- Large baking sheet
- Aluminum foil
- Ziploc bag or large air-tight container
- Basting or pastry brush
- Spoon
- Butcher knife or other sharp knife
- Optional: latex gloves
Tender Baby Back Ribs Directions
- If you have one full rack of un-cut baby back ribs, I would recommend cutting them in half. This makes them easier to manipulate later on rather than trying to move around one large set of ribs.
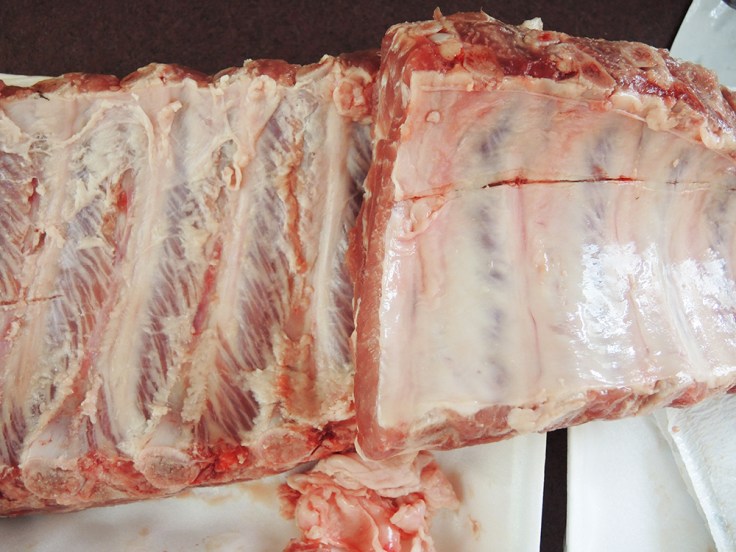
- Flip the ribs over and attempt to remove the “silverskin.” The silverskin is a layer of connective tissue usually found on the underside of ribs (but can also be found on tenderloin cuts as well). You do not absolutely have to remove this layer under the ribs because it can be a little difficult, but the ribs do turn out a bit better when you do. The dry rub can also reach the meat on the underside of the ribs better this way. In order to remove the silverskin, you need to use a knife edge to slice a piece of the sliver skin sitting on top of a bone. Don’t do this over the meat area because you could damage the meat. Using dry hands or a paper towel, grab hold of the flap you created and simply pull the silverskin off. Repeat this process until you’ve gotten all or most of it off. Sometimes the silverskin comes off very easily and other times you will have to work for it. Below you can see on the left where I started the process and on the right where the silverskin is untouched.
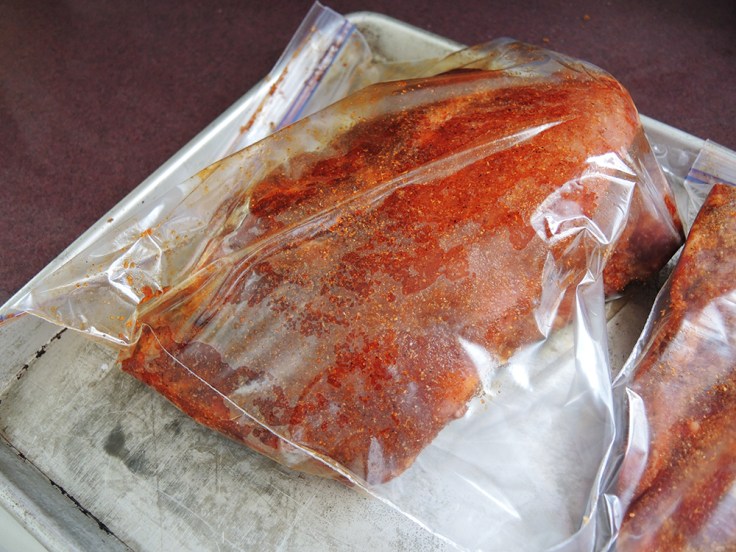
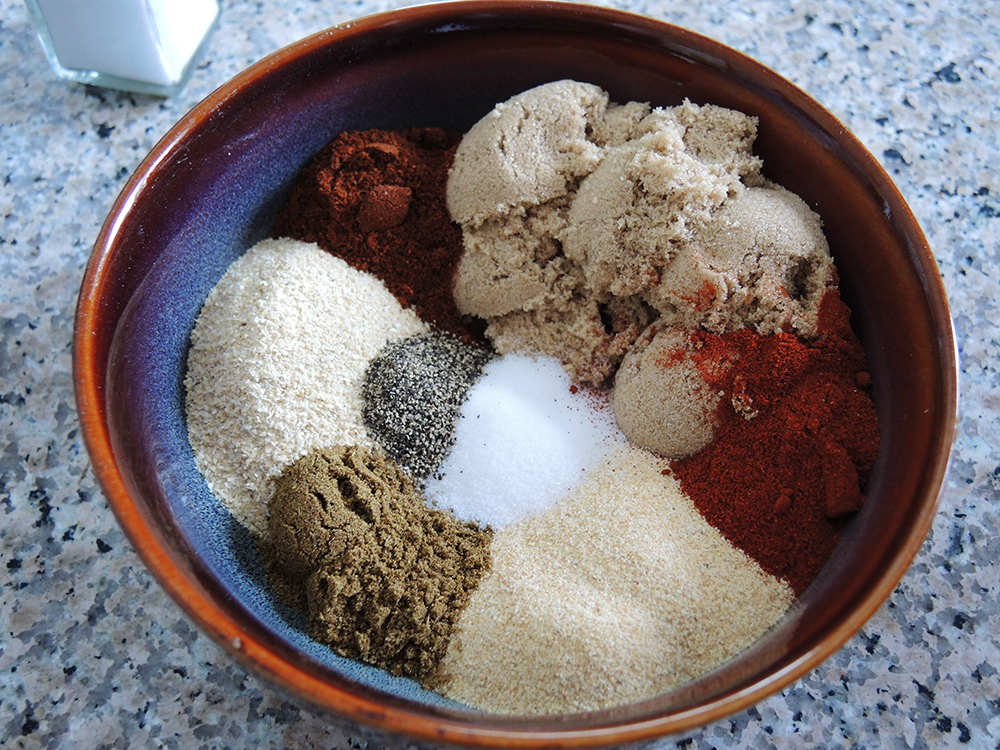
- Set the ribs aside and get the dry rub ready. In a bowl, add in the onion powder, garlic powder, brown sugar, smoked paprika, cumin, salt, pepper, and chili powder.

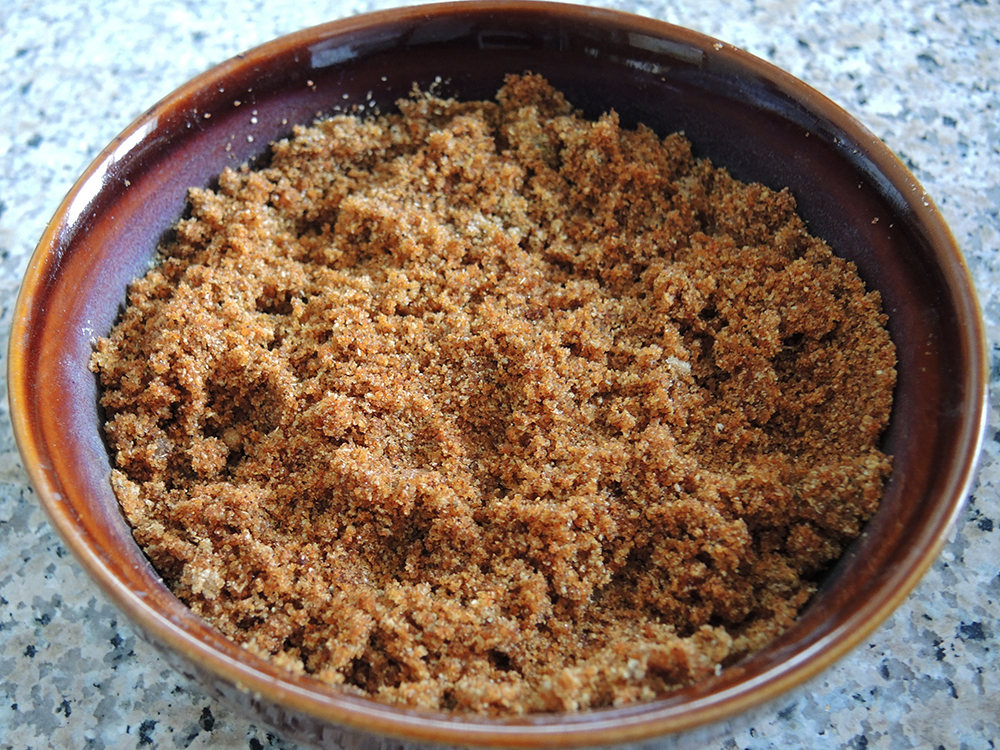
- Next, add in the oil and mix the dry rub very well using a spoon or your hands (this is where latex gloves really pay off).

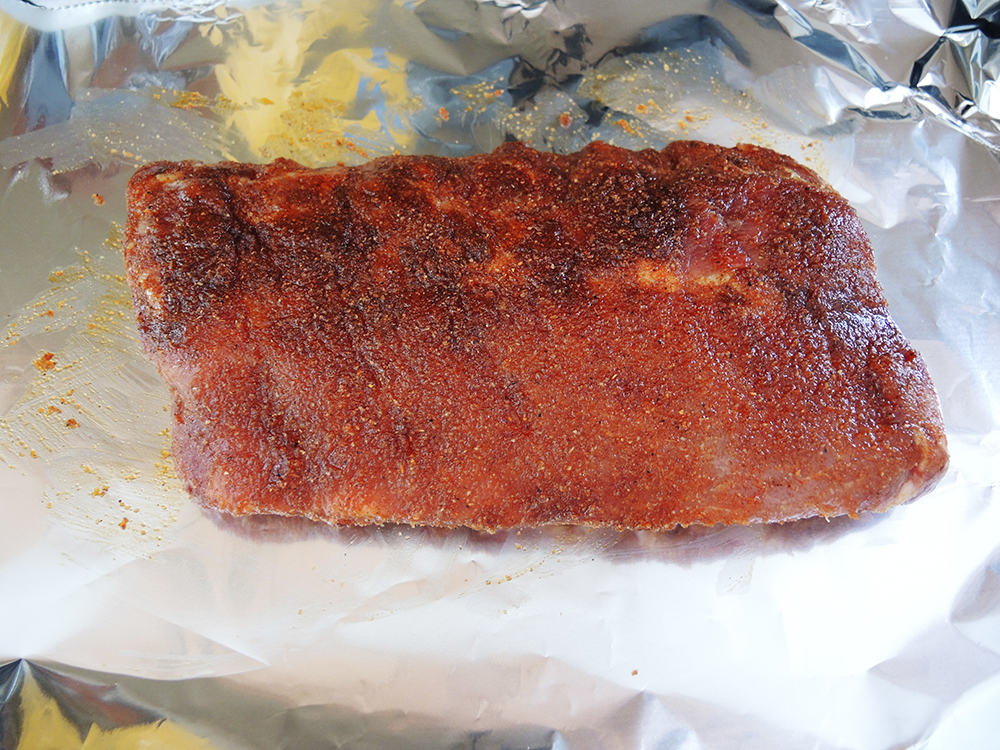
- Apply the dry rub evenly over the entire (top and bottom) rack of rib by really rubbing it all over.

- Place the ribs into a seal-able plastic bag or large air tight container to let them marinate in the rub. Again, cutting the ribs in half makes this much easier to accomplish. Let the ribs sit like this at room temperature for an hour or overnight in the fridge. If you leave them in the fridge over night, then let them sit outside the fridge for 30 min. to an hour before you are ready to cook them so they get to room temperature.
- After an hour has passed, pre-heat the oven to 250 – 260 degrees F.
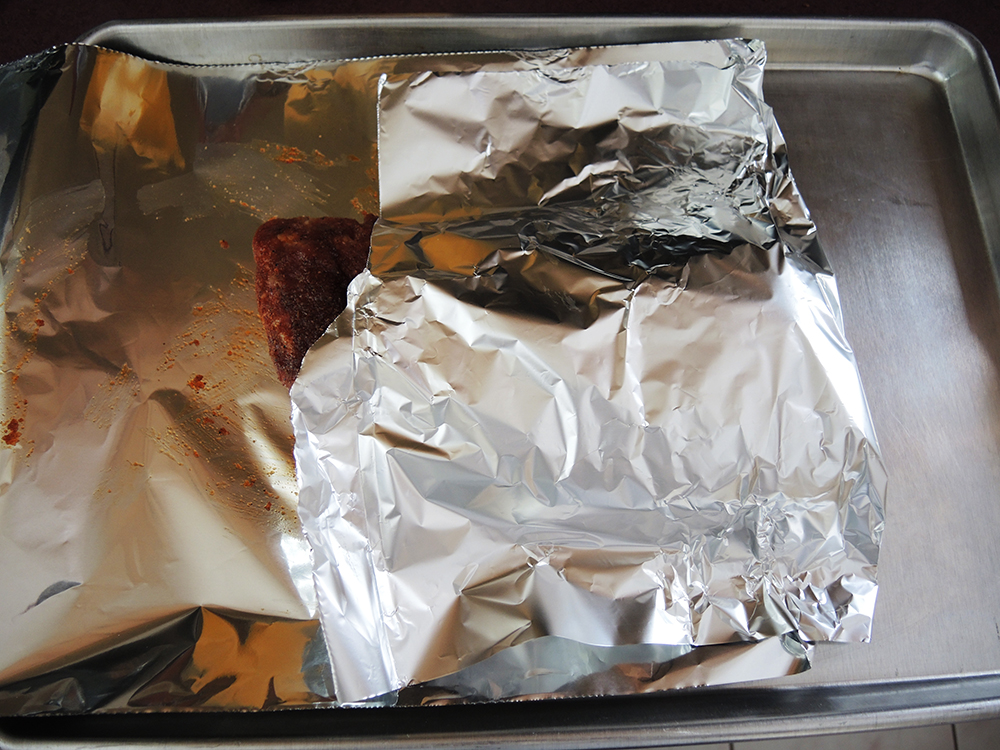
- Tear off a long sheet of aluminum foil and lay it over the baking sheet before placing the ribs on top of the foil. Set the baking sheet and ribs so that the longer sides are facing you.

- Now, you want to fold the foil so that it creates a pouch for the ribs. I usually start by folding half of the right or left side of the foil over the ribs.

- Then I fold the other half over as well. You may need to tuck some of the foil underneath the ribs if the foil extends beyond the edge of the ribs.
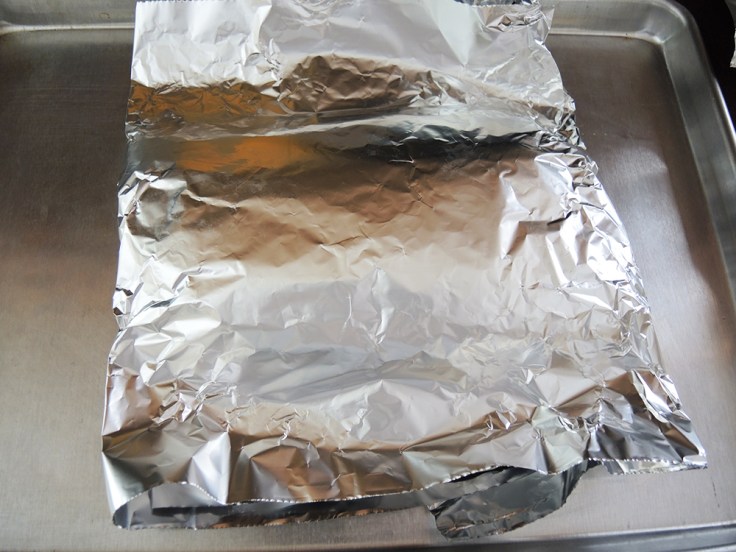
- The last step is to fold up and roll the open edges at the top and bottom so that they close the pouch.
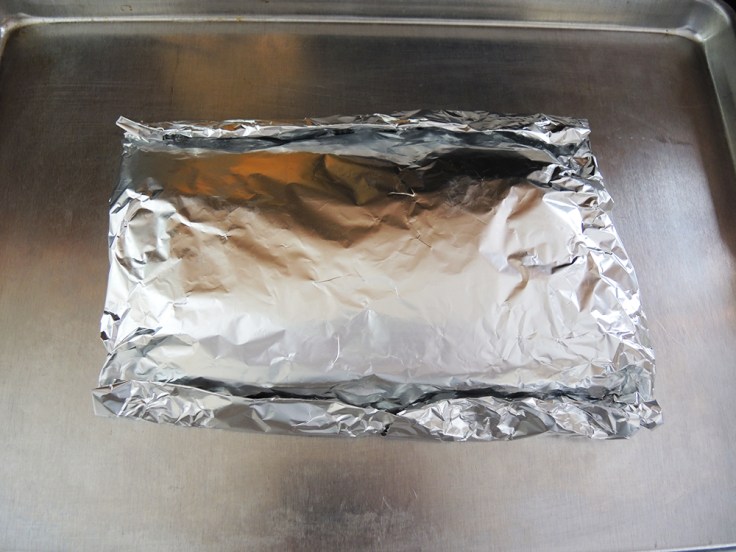
- Repeat this process with the other half of ribs, so that you have two pouches.

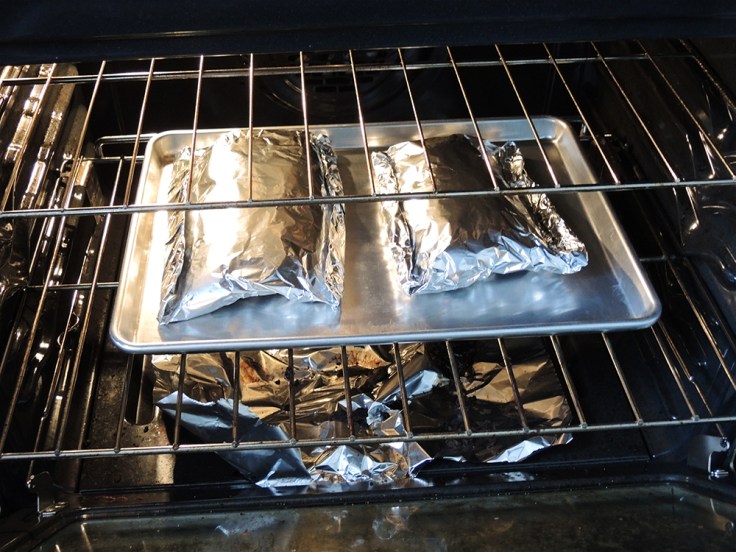
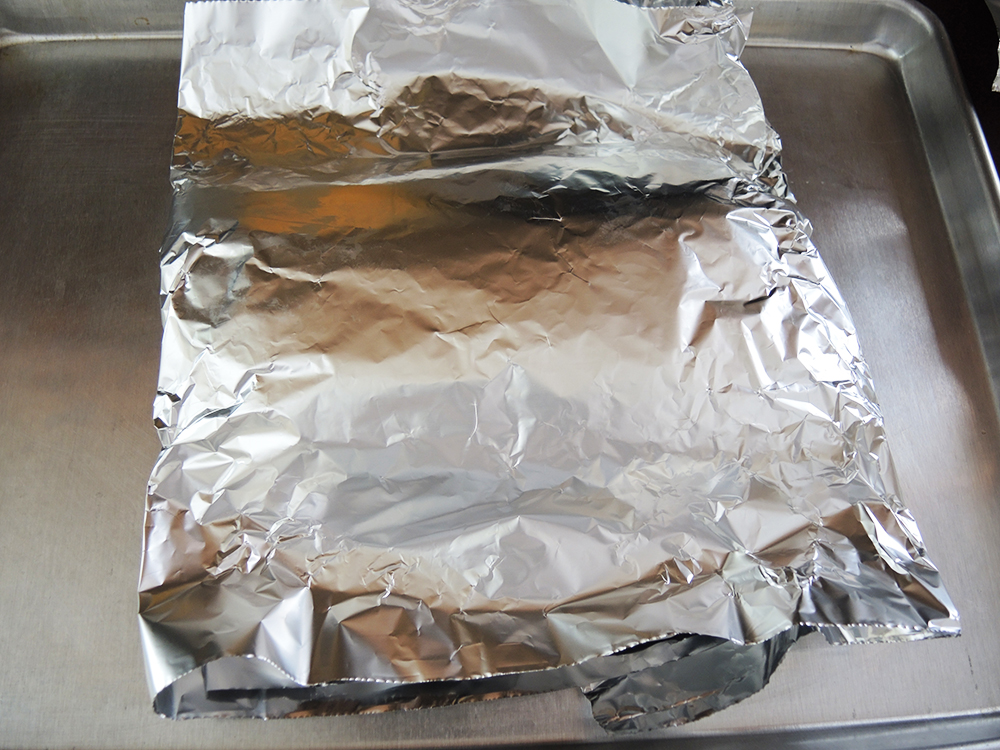
- When the oven has reached 250 degrees F, place the baking tray with the pouches of ribs on the middle rack of the oven. Then forget about them for 3 to 4 hours. You do not need to open the oven or check on the ribs at all during this time.
- After three or four hours, the ribs are done cooking, so remove them from the oven and set the oven to broil on High. [Updated Note: three hours gives you slightly firmer ribs while four hours gives you soft fall off the bone. I like to go about 3:15 to 3:30 myself].
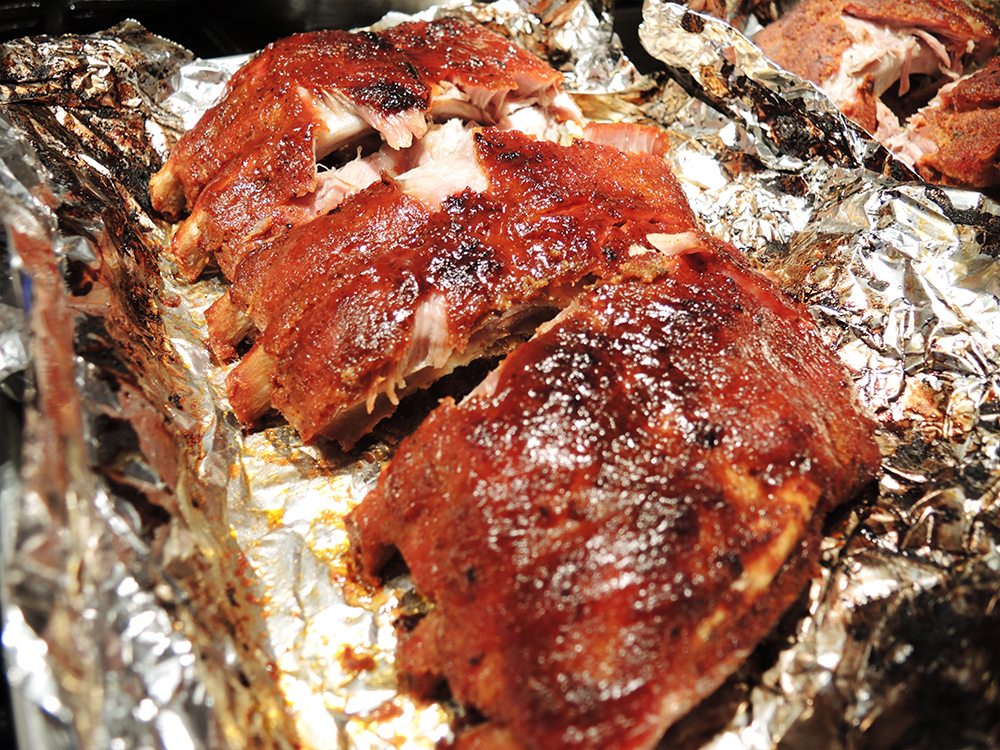
- The next step is tricky because you want to drain the pouches of ribs, which are now filled with liquid after cooking. Carefully make a small opening in the pouches and drain them into a heat safe container or bowl. You may need to move the ribs from the tray to do this. The idea is to get rid of the liquid without spilling that liquid all over the baking tray. You can save the liquid and make a gravy or glaze using it or just wait until it cools and discard it in the trash in a sealed container (plumbing apparently doesn’t like grease!).
- With the liquid gone, open up the pouches and let the ribs breathe! They will look a little strange at first, but that’s ok!
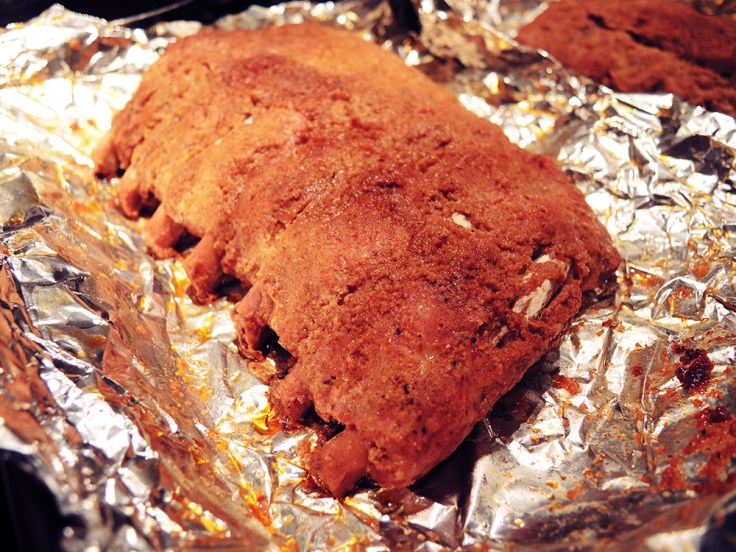
- Once the pouches are opened, place the ribs under the broiler for 3 – 5 minutes until they take on a little color and look a little crispier. If any grease from the ribs catches fire, simply take them out and remove the greasy area from the pan before returning the ribs to the broiler. You will need to watch the ribs carefully at this point so they don’t burn.
- Lastly, use a basting or pastry brush to brush on your favorite barbecue sauce on the top side of the ribs. I prefer a very light layer because barbecue sauce can overpower some of the more delicate flavors of the ribs, but that is up to you. Feel free not to use any at all if you don’t like barbecue sauce. You can also make your own BBQ sauce that goes amazingly well with these ribs using my recipe by clicking here.
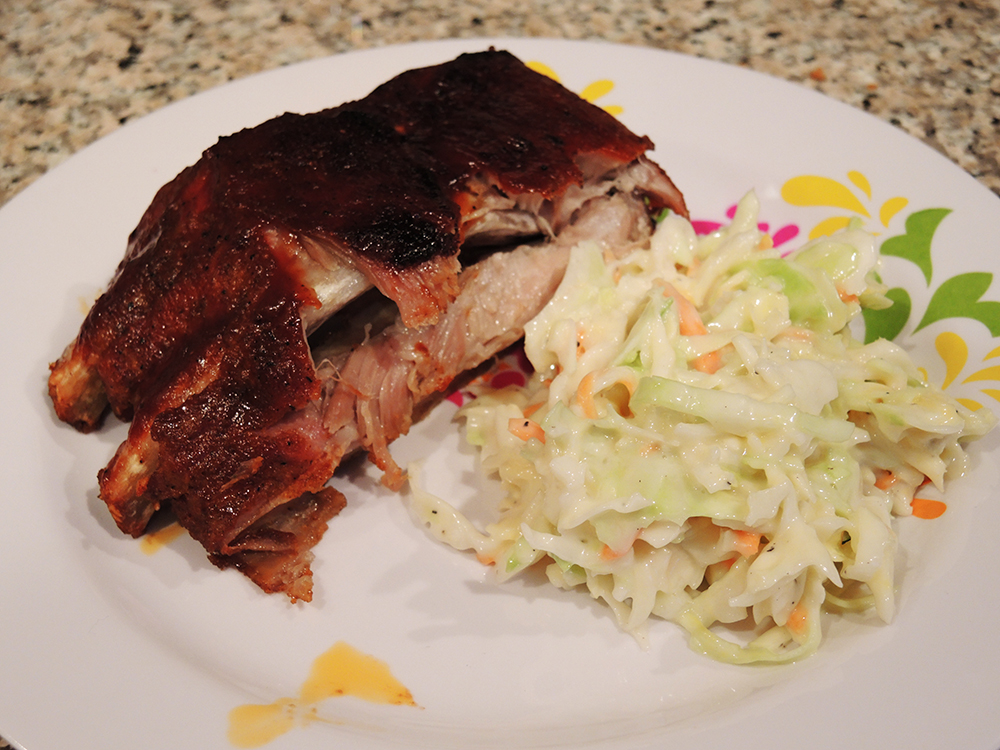
- Cut up the ribs using a sharp knife if you want to split up the servings.

- Serve them with other classic barbecue sides like corn, collard greens, mashed potatoes, roasted green beans, macaroni and cheese, or homemade coleslaw!

- Eat and marvel at how cleanly these ribs come off the bone!


_______________________________
Please Support Home Is A Kitchen!
No spam. Just real updates on recipes, restaurant reviews, travel, and free giveaways!
![]()
![]()
![]()
![]()
_______________________________

These were so delicious! They truly were fall off the bone. I would like to make them to bring to our friend’s cabin. Have you ever baked them ahead and then finished them later? Do you think I can bake them, let them cool so I can pack them in a cooler and then broil them in the oven when we get there?
Hi Paula! You can absolutely make these ahead of time and reheat them later. Just be sure to keep them sealed in an air tight container so they don’t dry out. You can either broil them or finish them off on a grill to crisp them up. I’m happy you enjoyed them! Thanks for stopping by!
I made these and they were delicious!!! Family loved them. Husband suggested cooking them longer. Would it affect them if they were cooked longer???
That’s great, Linda! Why did your husband suggest cooking them longer? Were they not tender enough? You could cook them longer if you wanted to get the desired texture. The only danger is they could get too mushy. They should come clean off the bone, but if they just turn to mush, that’s usually not so good. It’s also possible if you cook them for a super long time that the liquid would evaporate and they could burn.
delicious!!!!!!!!! Added some dry mustard like 1 tsp The only way we will cook ribs now!!!!!!!!!1
Oooooo, nice call with the mustard! I bet that worked really well. Glad you enjoyed it!
Working at a meat shop forever I will tell you some tricks for removing silverskin or membrane from ribs. First, you can always ask butcher to do this before you buy them. If not, then you will want to remove it before you cut them in half. Always start at the smaller end. Count about 3 ribs in and slide your index finger down the back of the rib. Between the membrane and bone. Now hooking your finger, pull it towards the small end of the rack, separating membrane from rack. Using a towel or wad of paper towels, grab membrane and pull off rest of rack. Should come off in one piece. Hope this helps. Keep in mind you do not have to remove the membrane and sometimes it helps hold the meat together and stay on the bone. It is edible.
Thanks for the tip, Aimee! People have differing opinions on whether to keep the silverskin off or on, but I agree that it’s somewhat irrelevant because the ribs will taste good regardless. I’ve noticed that with the silverskin on, sometimes the rub doesn’t get into the underside of the meat as much, however, the ribs are more tender. It just comes down to personal preference.
Aimee I just tried your way of removing the silver skin and it is by far the easiest and most efficient way I have ever found. Will definitely be my go to from here on out. Thank you.
I used my own take on this recipe for my very first attempt at ribs and it was a huge success. My wife said “the best ribs I have every had” and I have to agree. Thanks for helping to make my Super Bowl BBQ a huge hit!
PJ D.
That’s awesome PJ! Thanks for checking out the recipe. Glad your BBQ was a success.
I made these for the superbowl and everyone didn’t believe that I made theses. Everyone including my wife thought I ordered them best ribs I’ve ever made
That’s fantastic, Joseph! Thanks for trying the recipe and checking out the blog. I’m happy it was such a success.
Literally the best Baby Backs I have ever had. Your rub mix is legit! They didn’t need any BBQ sauce. Followed your extremely detailed procedure exactly. Thanks for your thoroughness!!
My pleasure! Thanks for trying it out!
I have tried making ribs many times and always the same, dry, taste like sawdust. But my husband and I tried your ribs and man are they awesome!! Let me tell you the ribs will be on our meal table more often now!! Thanks for sharing this awesome recipe.
Thanks for trying the recipe, Connie! What a privilege to have a recipe on your meal table!
I’ve been cooking for a very long time, but when it came to steaks, and ribs I’ve always let my husband do it. Today I bought some baby back ribs and I honestly don’t know how to cook them without them turning into a piece of leather. So, I looked and searched the Internet for a recipe to make these ribs and I came across yours. At first i was gonna use the recipe because I had all the ingredients, but now, DAMN!!! , these are the best ribs I ever tasted! Thank you so much for sharing it! I love how it was easy to follow the instructions, but most of all the taste, juiciness and the awesomeness of it falling off the bone!! I am now forever your fan!!!! Thanks for dinner! Christine G. Albuquerque NM
Thank you, Christine! I’m happy you enjoyed them. I hope you enjoy the rest of the blog as well!
Fantastic!! I love my ribs sticky though, so I used the liquid from the pouches with a tablespoon of bbq sauce. Reduced it down a bit and used it as a glaze. They were awesome, thanks for the recipe.
My pleasure. That’s really inventive regarding using the juices from the pouch to create a glaze! I’ll have to give that a try myself.
Followed this recipe to the t, fantastic! Family and neighbours loved it! Our 4 year old ate half a rack! Highly recommend A++++.
Awesome! Your 4-year old knows how to eat!
Very nice! This method is very close to what I do! Here are my tweaks to it:
I poke lots of small holes in the top layer of foil to let some steam escape so that the meat ends up with a meatier texture… Keeping all the steam trapped inside seems to give the meat a mushier texture.
After ~4 hours, I take them out but allow the ribs to rest while still inside the foil packet since they’ve been allowed to partially breathe while cooking – plus, plenty of extra steam escapes from the end I open up in order to drain the liquid. I also use this time to prepare the sauce.
Instead of discarding the wonderfully flavorful liquid, I combine it with some BBQ sauce I got from the store at about a 50/50 ratio then reduce it in a saucepan until it reaches the desired consistency.
Also, instead of broiling the ribs before adding the sauce, I sauce them first then let them broil for a few minutes so that it caramelizes on top to get them ooey gooey! 🙂
A bit late to the party but I wanted to thank you for this nonetheless. I recently made these and when my wife and I tried to pick up a rib by the bone, the bone pulled right out without a scrap of meat on it. If that’s not “falling off the bone” tender, I’m not sure what more it takes to qualify.
Thank you very much. I can’t see myself using any other method after trying this.
this is the best way to cook the ribs, They are fall off the bone and sooooooo tender. Every time I make them we always say these are the best ever….EVER!! So simple .wow!! Did I mention WOW THANKS FOR SHARING THE RECIPE
Thanks for trying out the recipe and the kind words, Gene!
I’m so glad you love the recipe, Gene. My pleasure!
This is the first time I’ve ever cooked ribs, and I couldn’t have picked a better recipe. Thanks so much for the photographs and descriptive directions. My ribs turned out tender, flavorful, and delicious. I can’t wait to serve them to my mom for Mother’s Day.
I’m really glad they turned out so well for you! I hope your mother enjoys them too. Happy Mother’s Day to her!
Thumbs up! i agree.. We made our mother happy!
This was my first time ever making ribs and they were a huge hit! There weren’t any left. I’ll I’ll definitely be using your recipe when I make them again. Delicious!
Thanks for giving the recipe a try, Lori! I’m thrilled you enjoyed it!
Never thought I could make such delicious ribs. I do now, thank you man fuel!
Making these for my husband’s birthday again! Thank you so much for this recipe. It is now my goto for baby back ribs.
Just found this recipe and after looking it and the reviews over decided to try them. Followed the recipe and didn’t use any sauce. After trying several other recipes promising “fall off the bone”, which they weren’t, all I can say is Oh My God these were absolutely fantastic! My husband put knives on the table, going on previous recipes, one of which I wouldn’t, make that couldn’t, even eat. They were put back unused after we ate. Definite a keeper. Thank you!
My pleasure, Carmen! So glad you enjoyed the recipe and it restored your faith in homemade ribs. Please stop by again!
Great idea tried it great great great ribs. Better than restaurant ribs and prices
High praise indeed! Thanks!
Is it better to use baby back or are back ribs just as good? thanks
Hi Nina! I could be wrong, but I believe that back ribs are the same as baby back. It’s just named differently. Nonetheless, this recipe will work for other bone-in cuts of ribs as well.
I have cooked ribs before (both pork and beef) – way differently. But my husband and son got started on Tony Roma’s – which I thought sucked. Then I saw they never expired (okay exaggeration but seriously a LONG TIME), so that scared the heck out of me. So I saw baby back ribs on sale the other day and vowed to find a recipe to knock their socks off and vow never to eat Tony Roma again. AND…I did just that tonight. The first words out of their mouth!!!! YAY! OMG….easy, delicious and no more Tony Roma’s!!!!
Hi Alys! I’m very happy to hear that you and your family enjoyed the recipe. That’s great that you found a homemade alternative to pre-made ribs. Thanks for sharing and please stop by again!
This recipe was flawless! I’ve used several other recipes to make ribs, but this is the first time they’ve been perfect. Easy and delicious dinner. Will definitely use this recipe again! Thanks for posting!
Thanks, Abby! Glad you enjoyed it and I appreciate you sharing your experience.
If I only have 1.5 pounds of ribs instead of 3 pounds, do I also adjust the temperature or the cooking time? if so, how? Thanks!
Hi Terry, just leave everything the same for the most part. You’ll need less dry rub though. The ribs will be ready after 3 hours.
Many many thanks!
Just made your recipe for the “fall off the bone…..baby back ribs”……and WOW…..they were delicious!!!! The rub was just the perfect amount of spices…..and I did as you suggested…..and basted them with just a little bit of BBQ sauce. This recipe is definitely a keeper…..and they were exactly as you describe…..”fall off the bone”. Thank you for sharing it.
That’s great, Deborah! Thanks for stopping by and trying it out!
These sound really good. Question…do you think it would work to take them out 30 minutes earlier and finish them off on the grill so we could get a smoky flavor…and crisp them up a bit? We’re having people over this week-end and I’d love to try these. Thanks so much!
Hi Linda! You can definitely do that. I would go for a minimum of 3 hours and 15 minutes though. Crisping them up on a hot grill should only take a few minutes. Obviously you would skip the broiling steps in the recipe. Just be careful moving the ribs around. They should be ok, but they will be very tender. Try not to flip them too much on the grill. Hope you enjoy!
Thanks so much. Making these tomorrow. I’ll let you know how they turn out. I’m in San Diego, so we love to grill! Hello to Boston…one of our favorite cities!
I just made it and it is wonderful! This is the first time I have ever made baby back ribs. I followed what you said and the did fall off the bone. Thanks so much!
I can see everybody loves the recipe. My results were not bad but not so great either. That may have been because of my own mistakes.
I cooked a single rack of baby back ribs. Cut it in two, used my own rub, put it in foil, cooked it exactly four hours at 250F, checked it with a laser thermometer probe which read 253F at the back surface.. I didn’t use any sauce. To my taste they were a tad overcooked and the seasoning was weak
Now, what may I have done wrong? My seasoning was recommended for ribs brined in a mix of salt and sugar before cooking. I’ve used this rub it before with brined ribs and it was great, spicy but not overpowering. In this case I did not brine the ribs, which probably explains why they came out lacking enough savory taste.
But I also think that cooking this way you may want to boost your seasonings, because all that steam tends to wash them off. I also think that four hours in foil may be a tad too long for baby back ribs. Maybe just right for spare ribs, not sure. Anyway, worth experimenting with.
Hi Eduardo! I appreciate the thoughtful response and exploring what may have gone wrong. I agree with you that if you don’t season properly that you may not end up with the results you want. I will say that the rub I provide and the quantity really do add flavor without overpowering the meat. It doesn’t wash off in the pouch. Maybe give my rub a try sometime and see if it works for you. I’m also glad you didn’t brine. It does add flavor (especially when smoking), but in this cooking method you would just end up with way more liquid steaming the ribs, which isn’t necessary or recommended. As for the cooking time, I agree that you don’t need 4 hours for the ribs to be ready. That’s why I recommend checking at 3 hours. Personally, I pull them between 3:15 and 3:30. For people that want true fall off the bone, then 4 hours works. For people that want something closer to BBQ ribs texture (i.e. Tug off the bone using teeth) then I recommend 3 hours. Hope that helps! Thanks for stopping by and trying it out.
Liquid smoke is a great way to sneak in that smokey flavor your looking for if you can’t actually use a smoker. I mixed mine in with the dry rub.
Fantastic recipe! I’ve made these three times and the fourth rack is sitting in the fridge for an overnight rest now.
First time making babybacks and was worried I would try them out…I usually do spare ribs and take them down to a Saint Louis.This recipe was perfect..I actually finished them on the grill with char coal as I finished by burgers..Thank you for posting that recipe..
You’re welcome, James! Great ideas to finish them on the charcoal grill!
This recipe is absolutely delicious I took every direction to the T and the ribs were wonderful.
I couldn’t believe how delicious the ribs came out the best ribs I’ve ever had in my entire adult life of 50 years
Hey Ken, I’m glad you enjoyed them and that’s high praise indeed!
Great everytime I make this.
Can be done and frozen for later.
Shred the meat off the bones if any leftovers and make pulled pork sandwiches.
Great ideas!
Just tripled this recipe for 3 full racks. Wonderful. I had to make ahead of time for a small dinner event so plan on freezing them. Any suggestions when reheating. I don’t want to dry them out. Turned out perfect
Hi Diane! I’ve never tried freezing them, but hopefully you didn’t put the sauce on yet. My suggestion would be to let them thaw slowly in the fridge (it may take a day to thaw out) and then once thawed let them sit out covered at room temperature for an hour. Then I would preheat the oven to 350-400 degrees F, cover the ribs with foil, and let them get warm. Obviously you don’t need to cook any longer, so maybe let them warm up for 10 – 15 minutes or until they feel warm enough. Then lastly, do the steps of the recipe to broil to crisp them up again and then baste lightly with sauce. I hope they work out for you!
Thank-you for this recipe! I have made these twice now. The first time exactly to your recipe – and they were lovely, albeit slightly dry in my view (but I think that is my oven and that I didn’t have my foil tightly sealed – its not a judgement on the recipe).
So the second time I made them, I pulled out a trick from a Jamie Oliver rib recipe I used ages back. I followed your recipe to the letter, but at the 2 hour mark, I pulled the ribs out of the oven, poured a hefty splash of apple juice into each foil parcel (just made a cut in the foil at the top) and resealed with another sheet of foil.
When they go under the grill for basting, I just left them under the grill for 2 or so mins on High to ‘dry’ the surface out a little bit, then I basted them as per the recipe and that was that.
I think the apple juice worked really well and took these ribs from being undeniably awesome already -to stratospheric!
Thanks again for a great recipe! I will pass this one along.
Hi Sarah! I’m glad you enjoy the recipe. I’m surprised they dried out at all. I’ve never had that happen, but I guess it’s possible depending on the oven. Regarding the apple juice, that’s a great idea if you do need more moisture. I use apple juice when I’m smoking ribs in my smoker and the air gets dry. I leave a pan of apple juice in there to add moisture and flavor. Apples and pork do go great together! Thanks for sharing!
I’m not such a great cook and haven’t been successful with ribs in the past so after quite an extensive search I settled on your rub and cooking method as it seemed so straightforward and I liked that you provided pics for each step. Well, guess what? I cooked ’em last night and they came out fantastico!. Hubby gave a big thumbs up so I’ll be making this my go to recipe now that he wants my baby back, baby back, baby back ribs!!
That’s awesome, Jacki! Glad I could help! Have a great holiday season knowing that you can make ribs.
Really great recipe! I’ve been using it with family and friends for years now and have it memorized :). I have 3 kg (6 pounds) of ribs in the oven now. Does the cooking time change at all?
Thanks so much!
Thanks! For 6 pounds of ribs you may be able to get away with roughly the same cooking time if you have a large oven and you break the ribs up onto two baking sheets or so they aren’t all crowded. I’d recommend 30 minutes longer max to try it out. The reason the cook time doesn’t change too much when you double the recipe is because 3 pounds of ribs (or a full rack) doesn’t tax the resources of a normal good sized oven. Doubling the amount means you should be ok, but let them go 20-30 min longer if you’re concerned and check them.
Youssef- Thank you so much for this wonderful recipe! I live in New England ( think you do too) and it is way too cold so was trying to think what I could cook for a long time in the oven. I have never made ribs before and so lucky for me I choose your recipe! My family can’t believe I made them. Best ribs ever. Cheers and Happy New Year!
My pleasure, Leti! Happy New Year to you and your family!
Tried your recipe and have to say they were fall off the bone delicious!
Thank you.
Awesome! Glad you enjoyed it!
Being I am me and it is January and 15 degrees in NY, I put my full sparerib rack on a weber kettle on indirect heat with a ton of cherry blocks for one hour (meat can only absorb so much smoke). I then followed this recipe per the directions. 1000% a perfect finishing mechanism when you don’t feel like tending the smoker for 4 hours in 15 degree weather. Thanks a Ton!!!!!
That’s great Kieran! Smoking a bit before finishing in the oven is a fantastic way to add smoky flavor! Good call and much respect for braving the cold weather!
Hey there, it January and I’m attempting ur recipe for 1st time, for my hubby watching playoffs… Need some manly sides… Tired of fufu-fancy… And same old same old. Wish we had corn on cob, we don’t want beans, and we r already having slaw… Help please
I have a pretty excellent cornbread recipe on the site. You can also add some deseeded and diced jalapeños to the batter for a mildly spicy version. You could also try potato or macaroni salad. Fried okra is also great. Fried green tomatoes? Roasted green beans? Dill cucumber and tomato salad? Pico de Gallo? Macarona Bechamel is good, but a little labor intensive. Also can’t go wrong with just some French fries or tater tots!
Tarot tots good idea yes it is along those lines I was looking thanks
Hey all my ribs are just about done… And suggestions for side dishes in response to my last post. Oh by the way anyone now how to make potato skins
Check out my friends website for skins. SO good! I put bacon, cheese, then more bacon though lol.
https://cleananddelicious.com/2010/02/01/game_day_potato_skins/
Awesome recipe! I have tried several and was never satisfied. I came across your blog. I read it thru and gave it a try last summer. My son in law is a meataholic and he thought they were great. We are waiting for the Super Bowl to start and we are cooking your ribs. Can’t wait to eat them! Just looking thru your other recepies and planning on cooking a few of those. Keep up the good work!
Thank you for sharing this recipe!!!
The most amazing ribs ever 😊😊
They came out perfect !!
You’re welcome, Donna!
These are, by far, the BEST ribs I have ever ever ever made! Everyone here agrees, even our 4 dogs who DEVOURED the bones! THIS is the way ALL ribs shall be made in this house henceforth, haha! I never leave comments anywhere, but these are so good I just had to say THANK YOU for sharing such an awesomely rib-ilicious recipe! 🙂
Thanks Alana! I appreciate you taking the time to comment and the kind words!
I made the ribs last night and they absolutely delivered what was promised…fall off the bone GOOD! I loved the rub, it perfectly complimented the ribs and any bbq sauce would pair well with it. My husband thought I was the best wife ever for all the ‘effort’ I put into this dinner! (They were super easy, but who am I to correct him?!)
Thanks for the awesome recipe. This one is a keeper and I can’t wait to make them again!! Slurp!
That’s great to hear, Allison! Thanks for giving the recipe a try and stopping by the blog!
G’day from Australia.. tried your recipe yesterday.. 1kg of ribs cooked 3.5hrs at 125 degrees C following every step except I used freshly minced onions and garlic, passed them 5 mn under the grill at the end of the cook and brushed with your home made bbq sauce recipe… seriously delicious.. was a bit anxious leaving the meat unchecked for so long, but the result is simply stunning, ” fall of the bone”, moist, tender, flavours jumping at you, one of those “suspended in time moments” where nothing else matters… cheers
So great to hear, Rod! Love that the recipe is getting some love in Australia! Enjoy!
Mmm were trying these tonight😉..smells and looks Great ! We added a teaspoon of dry mustard to the mix 😁
Could this be diet food? Lol! I make these monthly by the way. Love the recipe!!! This time I had a lot left over. So I have been taking 2 ribs, a piece of fruit and celery and carrots to work for lunch every day this week and after months of losing and gaining – I have lost 5lbs this week! I know it’s not diet food. But just saying….(it could be paleo – except not the fruit).
OMG that was amazing I did exactly as you said and YES the meat came off the bone…Thank You!
You’re welcome, Evelyn!