My recipe for fall-off-the-bone beef ribs has been so successful on this blog that I thought I’d go ahead and take a crack at making baby back ribs using the same oven technique. The benefits to using an oven are that you can make these ribs any time of the year and the oven regulates the temperature, which is often the trickiest part to grilling and barbecuing.
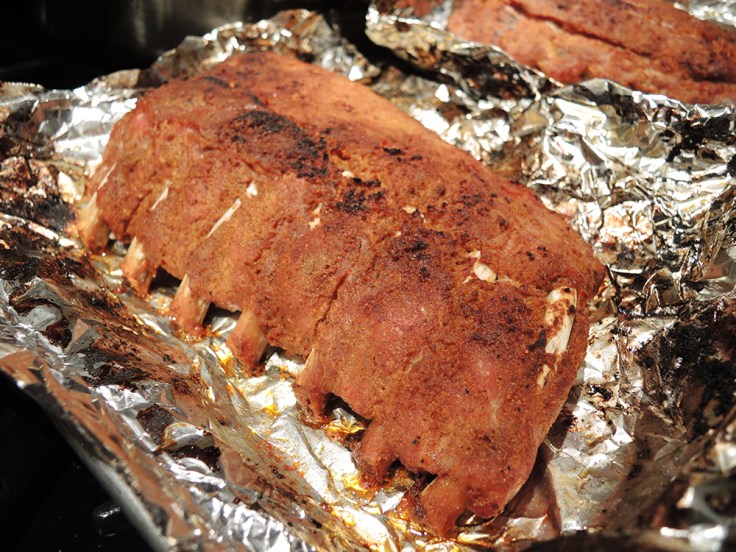
This time around the results were mind blowing if I do say so myself. Not only did the pork ribs turn out perfectly, but I think they’re even better than the beef ribs. They came out so tender that a mere tug removed the meat from the bone. What truly blew me away was how well the smoky-sweet dry rub marinade (combined with a light basting of barbecue sauce at the end) made these comparable to restaurant quality.
The only thing that would make these ribs better would be to smoke them for an hour before tossing them in the oven to finish them off. I’m very proud of this recipe and I would be surprised if other rib lovers don’t enjoy this as much as I do.
Recipes for Complimentary Side Dishes
- Chipotle Pinto Beans
- Fried Okra
- Collard Greens with Bacon
- Potato Salad
- Dill Summer Salad
- Buttermilk Cornbread
- Sweet and Spicy BBQ Sauce
- Carolina Vinegar Style BBQ Sauce
Fall-Off-The-Bone Baby Back Ribs in the Oven
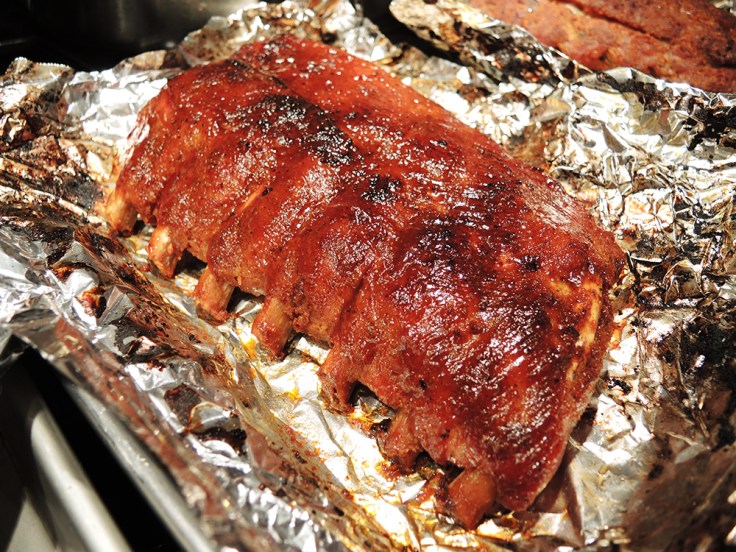
Clean off the bone, dry rubbed, and sauced baby back ribs.
Ingredients
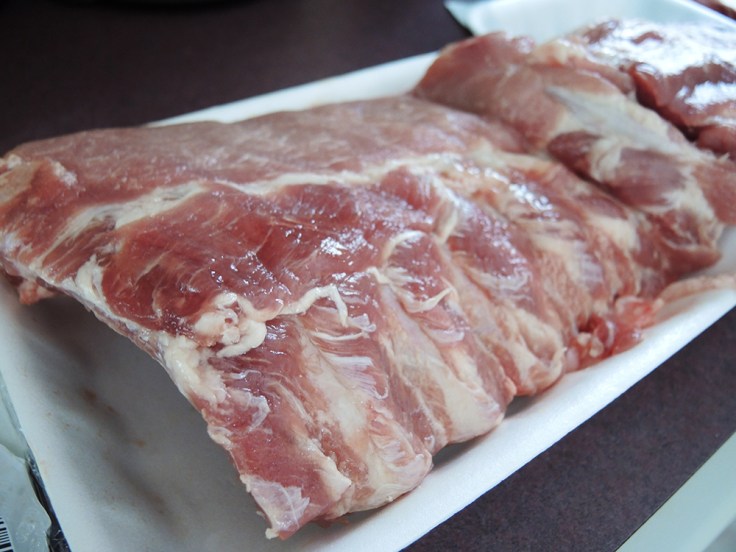
- One full rack (about 3 pounds) of bone-in baby back ribs
- 2 tablespoons onion powder
- 2 tablespoons garlic powder
- 4 tablespoons brown sugar
- 2 tablespoon oil
- 1 teaspoon cumin
- 1 teaspoon salt
- 2 teaspoons chili powder
- 2 teaspoons smoked paprika
- 1/4 teaspoon black pepper
- 2 tablespoons your favorite BBQ sauce
Equipment:
- Oven
- Large baking sheet
- Aluminum foil
- Ziploc bag or large air-tight container
- Basting or pastry brush
- Spoon
- Butcher knife or other sharp knife
- Optional: latex gloves
Tender Baby Back Ribs Directions
- If you have one full rack of un-cut baby back ribs, I would recommend cutting them in half. This makes them easier to manipulate later on rather than trying to move around one large set of ribs.
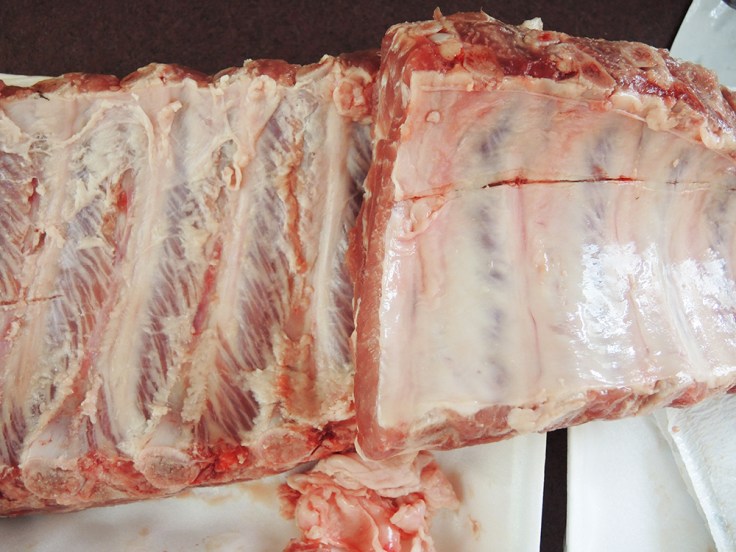
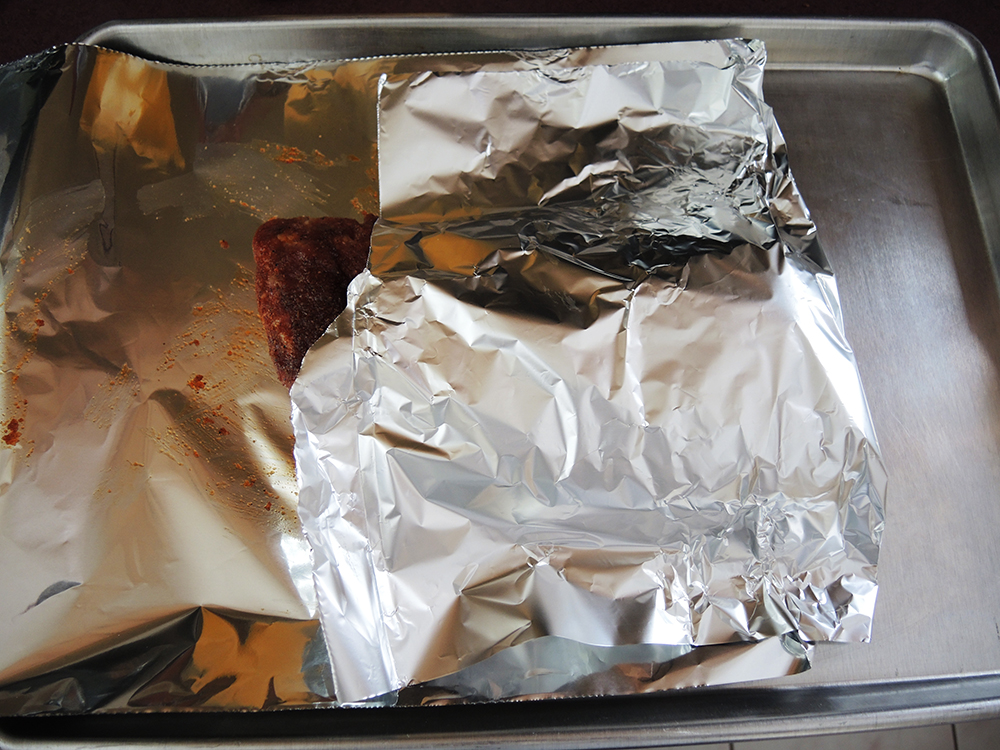
- Flip the ribs over and attempt to remove the “silverskin.” The silverskin is a layer of connective tissue usually found on the underside of ribs (but can also be found on tenderloin cuts as well). You do not absolutely have to remove this layer under the ribs because it can be a little difficult, but the ribs do turn out a bit better when you do. The dry rub can also reach the meat on the underside of the ribs better this way. In order to remove the silverskin, you need to use a knife edge to slice a piece of the sliver skin sitting on top of a bone. Don’t do this over the meat area because you could damage the meat. Using dry hands or a paper towel, grab hold of the flap you created and simply pull the silverskin off. Repeat this process until you’ve gotten all or most of it off. Sometimes the silverskin comes off very easily and other times you will have to work for it. Below you can see on the left where I started the process and on the right where the silverskin is untouched.
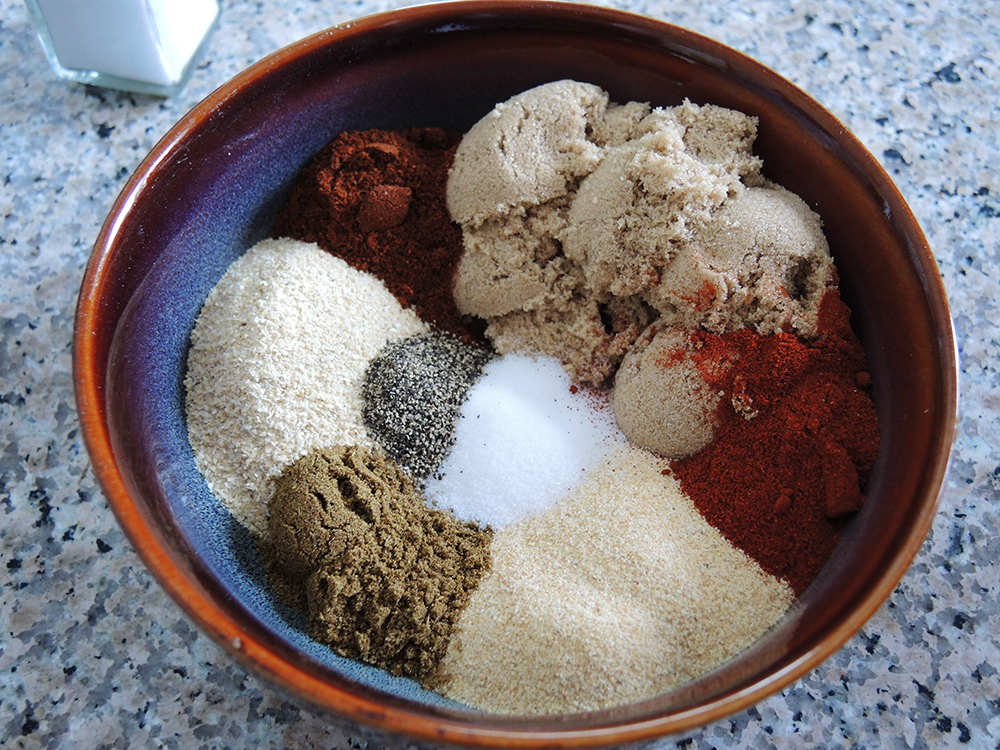
- Set the ribs aside and get the dry rub ready. In a bowl, add in the onion powder, garlic powder, brown sugar, smoked paprika, cumin, salt, pepper, and chili powder.

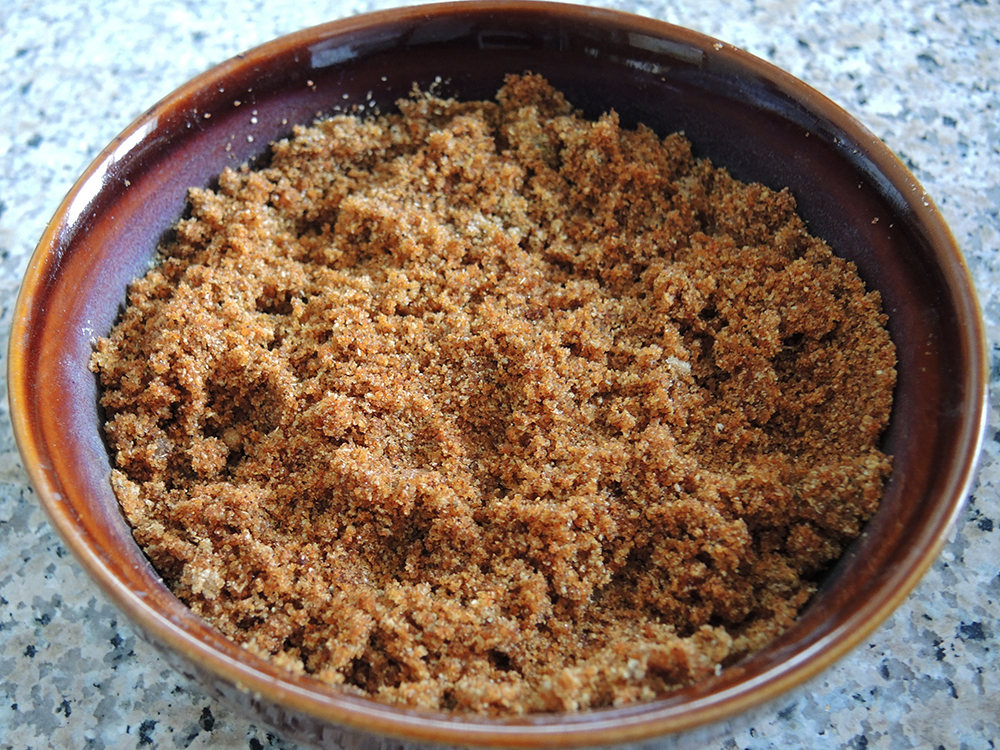
- Next, add in the oil and mix the dry rub very well using a spoon or your hands (this is where latex gloves really pay off).

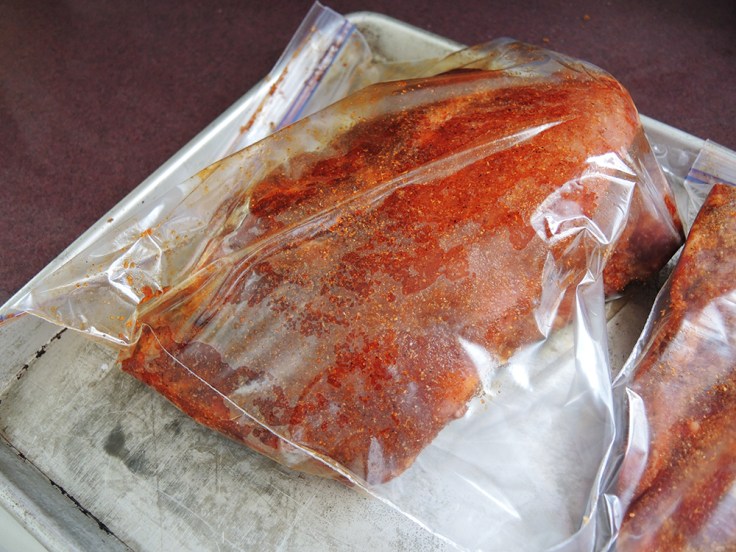
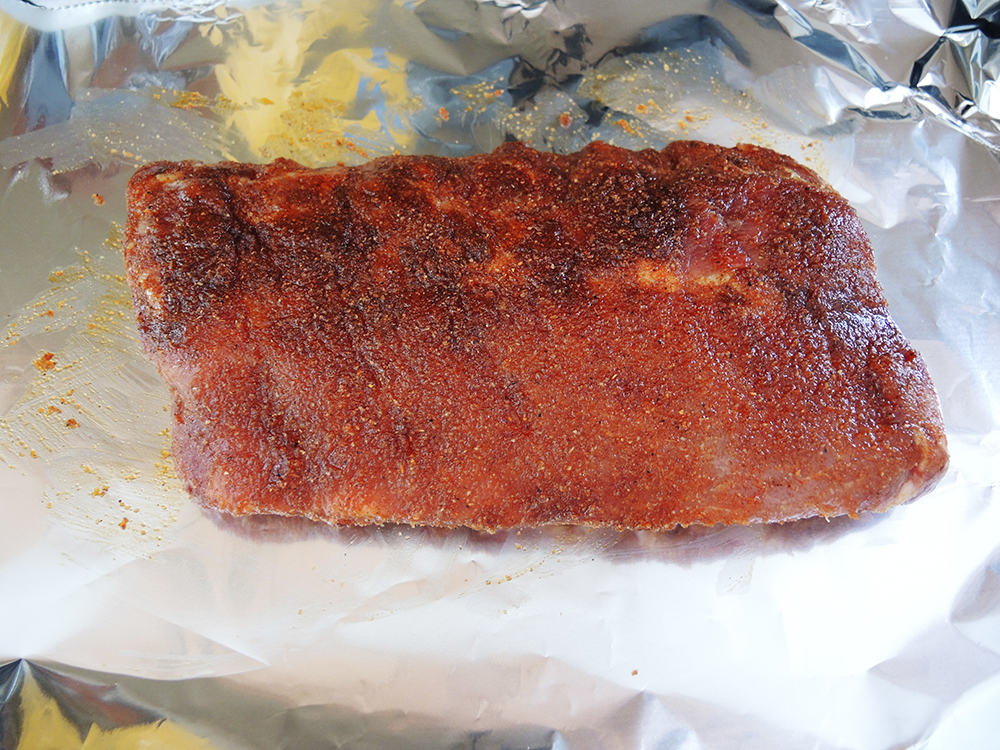
- Apply the dry rub evenly over the entire (top and bottom) rack of rib by really rubbing it all over.

- Place the ribs into a seal-able plastic bag or large air tight container to let them marinate in the rub. Again, cutting the ribs in half makes this much easier to accomplish. Let the ribs sit like this at room temperature for an hour or overnight in the fridge. If you leave them in the fridge over night, then let them sit outside the fridge for 30 min. to an hour before you are ready to cook them so they get to room temperature.
- After an hour has passed, pre-heat the oven to 250 – 260 degrees F.
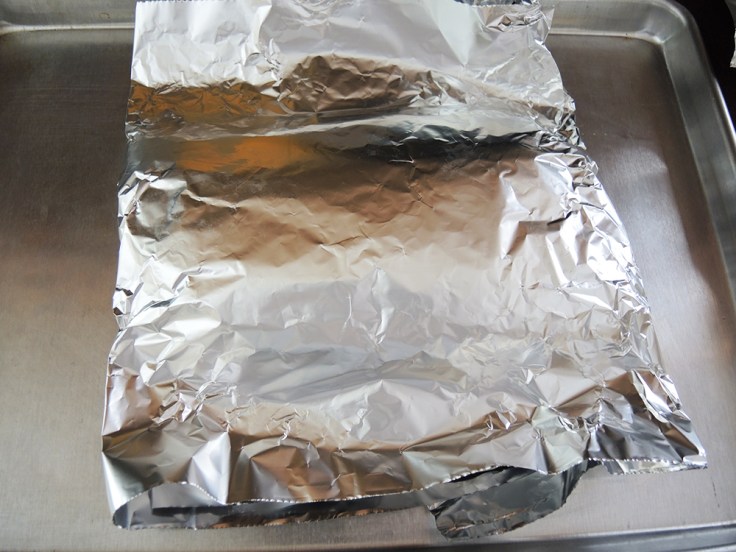
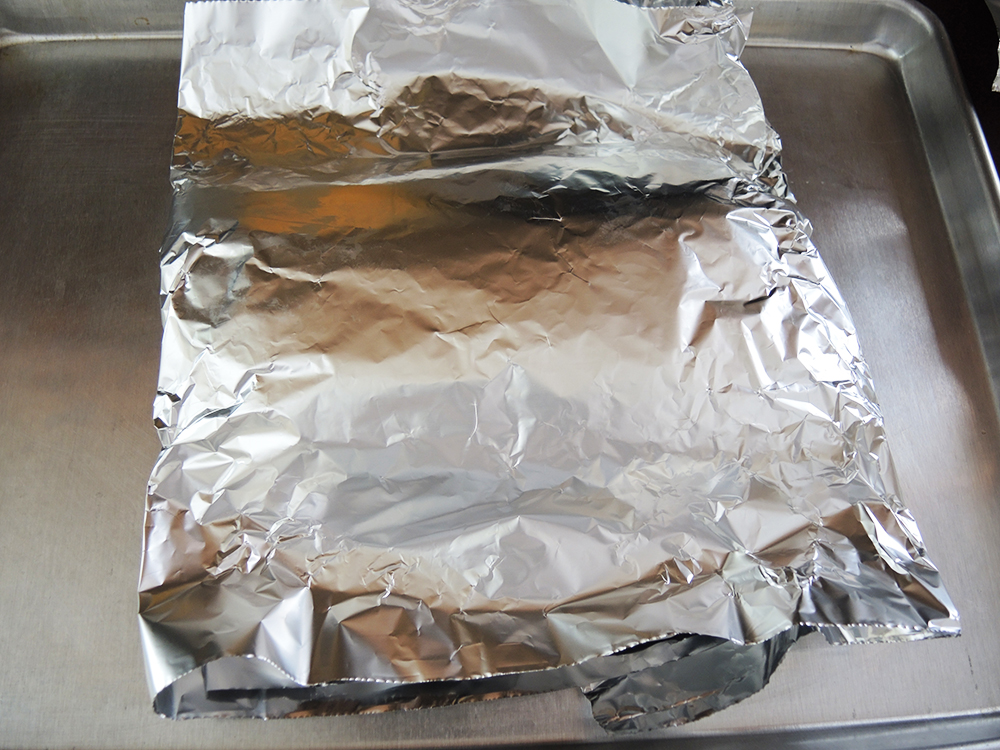
- Tear off a long sheet of aluminum foil and lay it over the baking sheet before placing the ribs on top of the foil. Set the baking sheet and ribs so that the longer sides are facing you.

- Now, you want to fold the foil so that it creates a pouch for the ribs. I usually start by folding half of the right or left side of the foil over the ribs.

- Then I fold the other half over as well. You may need to tuck some of the foil underneath the ribs if the foil extends beyond the edge of the ribs.
- The last step is to fold up and roll the open edges at the top and bottom so that they close the pouch.
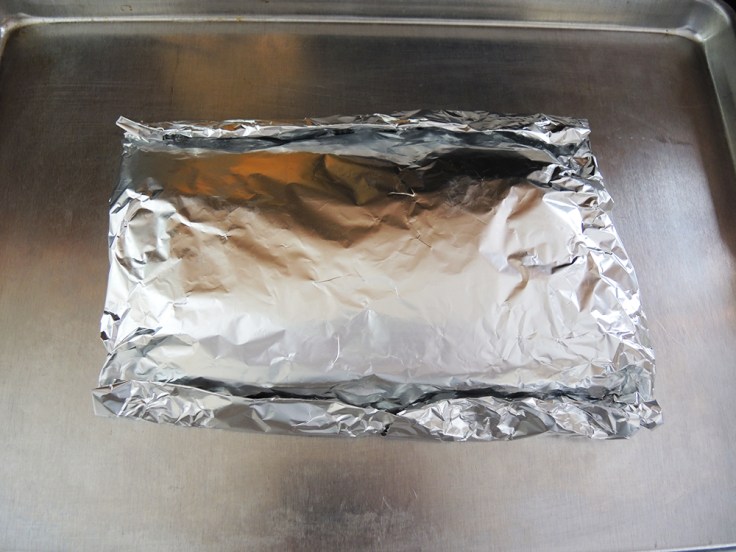
- Repeat this process with the other half of ribs, so that you have two pouches.

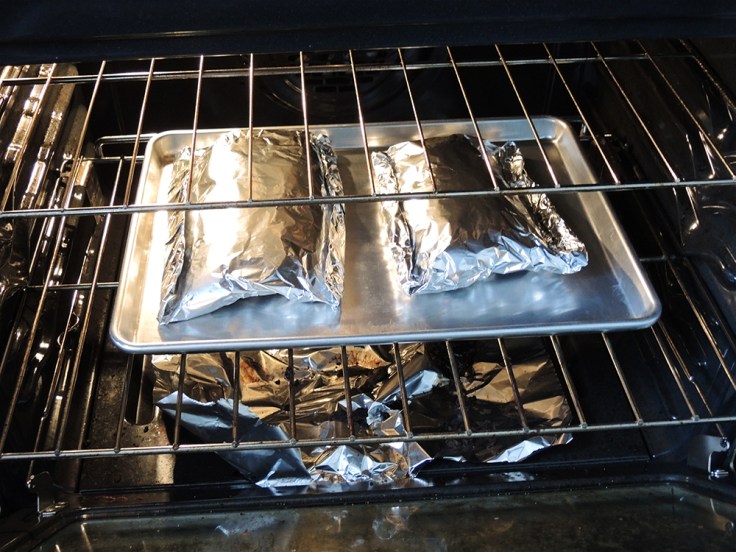
- When the oven has reached 250 degrees F, place the baking tray with the pouches of ribs on the middle rack of the oven. Then forget about them for 3 to 4 hours. You do not need to open the oven or check on the ribs at all during this time.
- After three or four hours, the ribs are done cooking, so remove them from the oven and set the oven to broil on High. [Updated Note: three hours gives you slightly firmer ribs while four hours gives you soft fall off the bone. I like to go about 3:15 to 3:30 myself].
- The next step is tricky because you want to drain the pouches of ribs, which are now filled with liquid after cooking. Carefully make a small opening in the pouches and drain them into a heat safe container or bowl. You may need to move the ribs from the tray to do this. The idea is to get rid of the liquid without spilling that liquid all over the baking tray. You can save the liquid and make a gravy or glaze using it or just wait until it cools and discard it in the trash in a sealed container (plumbing apparently doesn’t like grease!).
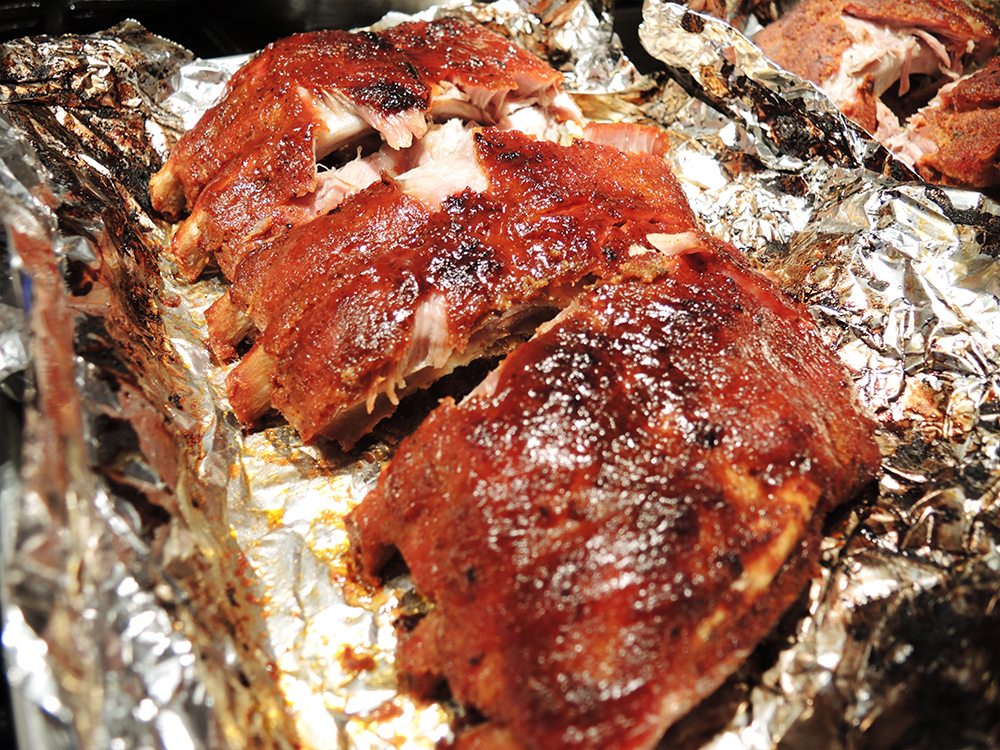
- With the liquid gone, open up the pouches and let the ribs breathe! They will look a little strange at first, but that’s ok!
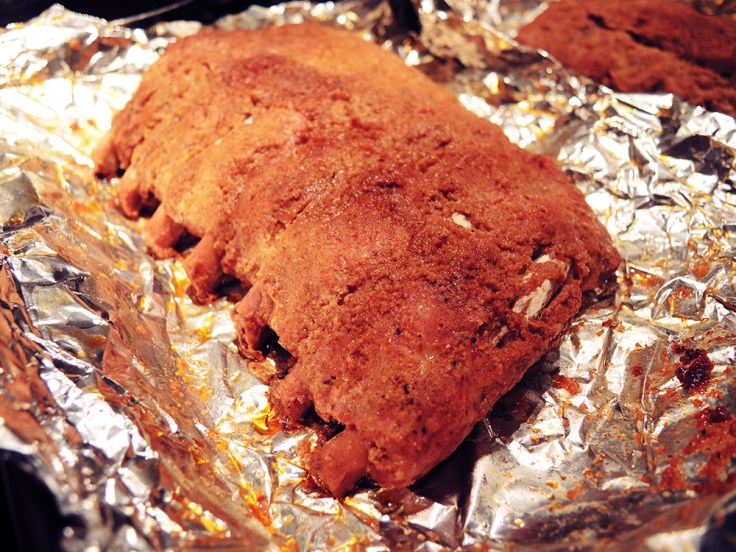
- Once the pouches are opened, place the ribs under the broiler for 3 – 5 minutes until they take on a little color and look a little crispier. If any grease from the ribs catches fire, simply take them out and remove the greasy area from the pan before returning the ribs to the broiler. You will need to watch the ribs carefully at this point so they don’t burn.
- Lastly, use a basting or pastry brush to brush on your favorite barbecue sauce on the top side of the ribs. I prefer a very light layer because barbecue sauce can overpower some of the more delicate flavors of the ribs, but that is up to you. Feel free not to use any at all if you don’t like barbecue sauce. You can also make your own BBQ sauce that goes amazingly well with these ribs using my recipe by clicking here.
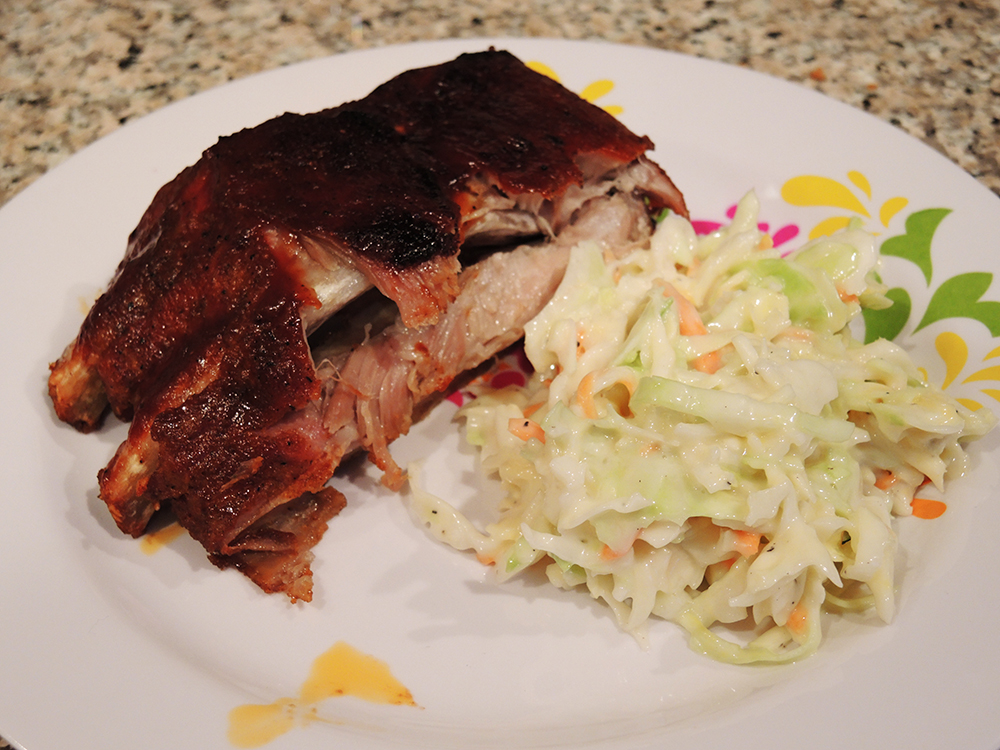
- Cut up the ribs using a sharp knife if you want to split up the servings.

- Serve them with other classic barbecue sides like corn, collard greens, mashed potatoes, roasted green beans, macaroni and cheese, or homemade coleslaw!

- Eat and marvel at how cleanly these ribs come off the bone!


_______________________________
Please Support Home Is A Kitchen!
No spam. Just real updates on recipes, restaurant reviews, travel, and free giveaways!
![]()
![]()
![]()
![]()
_______________________________

These ribs look and sound so tasty and of course we want the barbecue sauce! Cheers!
You can tell how tender your ribs were by how clean the bones are…they look great.
Wow! Those look insane! Must try that! How many portions did you get?
This will give you two half-rack portions, which are pretty big for two people. One full rack would be too much for one person, although they are delicious enough that I could see someone eating the whole thing. I ended up making about 6 very small servings as a complement to a full dish with sides. The portions are really up to you.
I made these for my Husband last week….and I made them exactly how the recipe calls. These were the BEST ribs we have EVER had!! And thank you so much for posting this recipe 🙂 My one question is that I would like to make 2 racks tonight, how long do you think they will take in the oven? Thanks!!
Hi Chelsea! Thanks so much for trying the recipe. I’m really glad you enjoyed it! If you’re going to make two racks, it should take about the same amount of time as long as the racks are in separate pouches. You might consider leaving them in 30 min longer than you did the first time, but I think two racks isn’t going to affect the time all that much.
How long should they cook if the ribs are pre cut? I’m making them now and can’t wait.
Hi Lauren,
Even if they are pre-cut, just cook them for the same amount of time in the recipe. Group them in a packet/pouch as if they were not pre-cut. I hope they turn out well! Please let me know!
OMG best ribs I have ever made!! They were perfect!
Awesome! Thanks so much for trying the recipe and I’m glad they turned out so well!
Made these before many times and they are perfect! If I wanted to make 2 racks instead of 1, would you recommend doubling the cook time? Thank you for the recipe!
Hi Felicia, no need to double the cook time for two racks. If you have a regular sized oven (especially one with convection), then the usual time should be just fine. If you’re not quite sure, you could let them go 20-30 min longer than what you’ve done in the past, but I don’t think you’ll need it. Thanks for stopping by and I hope you enjoy the ribs yet again! Happy Holidays!
I’m confused on what the purpose of the baking sheet is for? Your instructions say to put the tin foil on top of the baking sheet and I’m not sure what the point is? And yes I’m currently in the process of using your recipe to spice up my dry rub ribs lol!!!!
There are a couple of reasons for the baking sheet. The first is just a practical one concerning moving the ribs around. The baking sheet gives you a sturdy surface to hold the ribs and makes it much easier to put them in and out of the oven. This is especially true once they are cooked because the ribs get so soft that the pouch can bend and the ribs may flop around. The second reason is the most important and that is the fact that the ribs will release a bunch of liquid while cooking in the pouches. As I mention in the instructions, this liquid will need to get drained. The baking sheet catches any liquid that may leak out of the pouches during cooking and makes it easier to transfer the pouches to the sink where you can then drain them if you need to. I hope that clears up the importance of the baking sheet/tray. Please do let me know how the ribs turn out!
My ribs came out with a great tasting dry rub and very very tender. Very nice easy to follow instructions. However I did something a little wrong I think and maybe you can figure out where I was off by a little. I couldn’t seem to get the ribs to have that crispy nonmoist feel to the top layer of the meat? They were still awesome but I bought another slab of ribs to make adjustments to whatever I did wrong. Any help would be greatly appreciated. Thank you.
I’m glad they tasted good and that you enjoyed the rub. I can think of three potential reasons for why the outside of the ribs might have been too soft. The first is that you may not have broiled them long enough. Broiling can be tricky, so you want to watch the ribs carefully while you do this. When broiling you want to get a nice color and crispiness without burning the ribs. If they are browning too quickly, move them down a level in the oven or set the broil to Low instead of High. The other possible reason could be the surface area of the ribs and the amount of dry rub (i.e. some ribs are wider than others even if they are the same weight). You should coat the ribs with the rub so that everything is covered, but you don’t want to cake the dry rub on so that it forms a thick layer. A thin layer of dry rub is key to getting some crispiness later. One more possibility is perhaps using too much barbecue sauce and letting the ribs sit in the sauce too long. Try brushing the sauce on lightly just before serving and add more to taste. I hope those ideas help!
Hi, the ribs I purchased are already sauced and smoked. Do you know how I can cook them?? I can’t find a recipe for them when they are already sauced anywhere! thanks
Hi Sarah! So, the ribs are already smoked and sauced? Forgive me, but the first thing to do is to check if they’re already cooked! I’m not sure I’ve seen smoked and sauced ribs that weren’t already fully cooked. If so, all you have to do is heat them up in the oven. Try 375 until they’re warm, but before the sauce burns. If they are actually raw, then what I suggest is wiping the sauce off of them before cooking because the sauce will probably burn due to all the sugar. You can either bake them in a pouch like in this recipe or you could coat them in the dry rub after wiping the sauce off and then proceed with the pouch. Without knowing what kind of ribs these are, that’s my best suggestion! Please let me know what you decide to do and how it came out!
I usually cook my ribs in the slowcooker with homemade BBQ sauce. Saw this recipe and decided to try it. Amazing ribs!!!! The only thing I did different was finish them off on the BBQ. My new rib recipe.
Hi Joanne! Thanks for trying out this recipe. I’m happy you enjoyed them! Finishing the ribs off on the grill is a great idea. I’m sure they’re great that way!
The ribs are in the rub right now,,,and i’ll go shower while the “marinate” in their spices. I’ll let you know how they turn out. This is my “mother’s day” gift to me 🙂
Happy Mother’s Day, Carol! I hope they turn out well for both our sakes! Please let me know how you liked them!
I made Baby Back Ribs with this wonderful recipe tonight. They were SO delicious and my husband scarfed them down in about 1 minute haha. The meat literally fell off the bone. They were perfect. I will be using your recipe from now on. THANK YOU SO MUCH!
That’s awesome! I’m glad they worked out so well for you and your husband!
Delish … “Honey … guess what’s for dinner?” 🙂
Wow these were amazing! I did exacly as you said with a kc style sause and I love it. I am now the favorite son in the house.
The sause came from
http://allrecipes.com/Recipe/A-Very-Popular-BBQ-Sauce/Detail.aspx
Hey Jason! That’s awesome that they worked out so well! I’m glad you are now the favorite son. May you hold on to your title for as long as you make great ribs! I’ll check out that sauce too. Thanks!
We ordered some pork ribs at a restaurant the other day and my son declared that “Mommy’s” ribs were waaaay better. So, now I’m making them again. Thanks for the great recipe!! The last couple of times that I made these, I tossed them onto the grill at the end and slathered them with sauce there, instead of using the broiler. Either way, the ribs rock! Thanks again.
Hi Elizabeth! Thanks for stopping by and trying the recipe. That’s some high praise from your son! Using the grill is a great idea. It’s a little harder in the winter, so the broiling helps out there, but if you have the grill, then it makes sense to use it!
How long did you put them on the grill for and on what temp? Thanks!
Hi Tina! Set the grill to high heat and just grill each side until they are a little crispier (a few minutes each side). This is more to your taste than any specific time period. Be careful moving the ribs around because they will be tender.
If I only have 3-3 1/2 hours before my husband goes to work and I just put them in the oven, what temp do you recommend to get them done before he leaves?
You can get away with 3 or 3.5 hours. They might not be as tender at 3 hours, but they’ll be cooked. 3.5 hours should be enough for sure. I hope they turn out well!
So, instead of trying to get that nasty skin off…..I scored it. I did follow the rest of the recipe and followed it precisely. I really got it good rub into the skin where I scored it on the underside. I did one lot of beef ribs and one lot of pork. I sealed and put them in the fridge for 20 hours. Cooked at 250 for exactly 4 hours then did drain and broil for 3 minutes per side. Invited friends over for the debut. We have all voted, these are the best ribs we have ever eaten. We all complained that there weren’t enough (10 lbs uncooked) as we wanted more they were so fall off the bone good, and the flavor is to die for. You are the king. All we needed for a side was salad as we became gluttons for the meat. I will make these over and over again and do not care what the calories are. Thanks so much.
Hi Diane! Thank YOU for taking a chance on these ribs and sharing them with your friends. I’m ecstatic that they turned out well for you and your guests. I really appreciate the kind words and I hope you’ll stop by again!
My husband didn’t believe that “fall off the bone” ribs could be achieved at home, thanks to your knock out recipe he now believes otherwise – thank you, these will definitely make their way back to our dinner table in the very near future!
That’s awesome Jennifer! I’m thrilled that you made your husband a believer. Thanks for stopping by and checking out the recipe!
I am going to prepare these for dinner tomorrow night. I am also going to tweet them out. I don’t like chewy or half-done ribs. These look succulent, tender, and juicy. I love the fact that you prepare them in the oven with fall and winter approaching.
Hi Vee. If you like fall off the bone ribs that are fork tender, then I think you’ll enjoy these. They are definitely a wonderful alternative for people who don’t have outdoor cooking equipment like grills or smokers. It’s also great, as you said, for when the weather is colder out. Please let me know how they turned out and what you thought of them!
how long do you cook two and half pounds of ribs in the oven
Try 3.5 hours.
This is really good. Thank you
You’re welcome!
Like everyone said – fall off the bone tender as hell ribs. I finished up slathering barbecue sauce on BOTH sides and broiled them a few minutes per side. This one is going in my recipe book.
Wow! The recipe book! I’m honored! Thanks for stopping by and trying out the recipe. I appreciate the kind words and I hope you enjoy this recipe for years to come.
I have made them this way for years, only I pouch them with just garlic and cider vinegar and then dry rub after cooling wrapped in plastic then into the fridge and then broil or grill. Tonight they are getting smoked to finish. Not sure if there is much different result in our processes, but to anybody that is on the fence of trying this method, it is the best way to do ribs that I have found
Did you use light or dark brown sugar?
Good question, but honestly it doesn’t matter. Both will work just fine. They’re interchangeable for these purposes.
Cool thanks mate can’t wait to give it a go.
Awesome. Please let me know how they turn out for you!
I don’t have a broiler. What can I do to replace it? Planning to cook this on New Year’s Eve 🙂 Please help!
Hi there. I’m not exactly sure what to do about the broiler situation, but here are some suggestions: 1) Grill – You could always finish the ribs on the grill to crisp them up a bit; 2) Toaster Oven – cut up the ribs into smaller portions and use a toaster oven (not a toaster!) on the toast/broil setting; 3) Cast Iron Pan – Get a greased pan really hot and sear the ribs (the problem is that the meat could fall apart as you do this); 4) Just Eat ‘Em – even without broiling these ribs taste good. Just baste some sauce on them and eat them without broiling. They won’t be crispy on the outside, but they’ll still be fall off the bone tender. I hope that helps!
Thank you for the suggestions. What if I place it in the oven with no foil and set the heat on th top part only? Will that work? 🙂
You definitely should cook the ribs in the pouch on the bake setting of your oven first. When you say to use the heat only on the top part of the oven, that sounds like a broiler to me. If you have a setting on your oven that only turns on the top of the oven and it gets really hot, then that sounds like it could be a broiler setting. When you are done cooking in the pouch, remove the foil and give it a shot!
Will give it a try and let you know. By the way, your blog has reached the Philippines! Thanks 🙂
The Philippines! That’s wonderful! I hope they turn out well. Let me know!
My search for the perfect rib recipe is over!!! It is worth all the effort and time, as the ribs truly fall off the bone and the whole family loved them!!!
Thanks, Michelle! I’m so glad your family enjoyed them. Happy New Year!
I am going to try this recipe this weekend. It will be nice to get some ribs and not have to be out in the weather.
Enjoy, Peyton! I hope they do the trick!
I love this recipe! Made them twice for family, unbelievable was their comments!
Thanks! That’s awesome and I’m happy your family enjoyed it so much!
Hi! I plan on cooking this for my family Thursday and I have a feeling it would come out great due to all the good feedback you’re getting! I’m not to sure what broiling is so could you tell me if I should put it on low or high and what rack to put it on? Thanks!
Hi Maria! I’m honored that you’d consider risking your family’s meal time on one of my recipes! I hope you’ll enjoy it. As for the broiling, that’s when your oven gets super hot on the top burner/coil of the oven only. Try placing the ribs on the middle rack and setting the broiler to high. Keep an eye on the ribs because they will crisp up quickly. They can go from crispy to burned very fast, so you really only want to broil for a few minutes. Check on them every 30 seconds or so after the first minute and don’t be afraid to shift them around if they seem to be getting too much color in one spot. Please let me know how they turn out!
Worked like a charm.
Awesome!
Can i skip the rub part?
Hi Vickie! You CAN skip the rub and you will still get fall off the bone ribs. The only think you’ll miss out on getting some of that smoky flavor directly in the meat. You’ll also miss out on some of the caramelization from brown sugar that compliments the pork. With that said, the recipe will work, but you should at least use BBQ sauce if you want it to taste like the typical restaurant rib. I hope that helps!
I have been looking for a good recipe for ribs. I made them and they were delicious. They were easy to make and as you said they fell off the bone. I made the rub and next time I am going to make your barbecue sauce. Thanks
Thanks, Judy! I’m happy you enjoyed the recipe and that it turned out well. I think you’ll enjoy the BBQ sauce too. It’s a little different than store bought sauces, but it goes wonderfully with these ribs.
These are in my oven and my whole house smell delicious. The silver skin came off pretty easy. Am I suppose to remove just the skin or some of the fat that is underneath the skin too? Thanks for the recipe.
Don’t worry about any fat under the silverskin. Definitely leave that on for flavor. The only time you should trim fat is if there’s a big fat cap like on a St. Louis style rib. Otherwise, you should be good to go! Please let me know how it turns out and I hope you enjoy them!
added some liquid smoke and these turned out great! Thanks!
This was the first time I’ve ever attempted to cook ribs and let me just say I followed your receipe but changed out a couple ingredients for the rub but they were fall off the bone and the best I have EVER eaten!!!!! Thanks so much for your recipe and directions, it was easy and yummy
Hi Angel! That’s so great! I’m glad I could help you find the best ribs you’ve ever eaten! Thanks for checking out the blog!
I made these last week. They turned out awesome & I didn’t even have the extra hour marinating time. Thanks for sharing 😊
My pleasure, Lisa! Thanks for stopping by!
Currently have the rub on my ribs sitting in the fridge. Turns out this rack was very long. Do I need to adjust cooking time if I need to put the foil pouches on two separate baking sheets? I imagine I’ll have to broil the baking sheets one at a time, but at least by then the ribs will be cooked.
Can’t wait to taste them tonight!
Hi Jas! I’m not sure how long the rack you have is. I usually need to cut a rack in half and I will make two pouches for each half. This makes them easier to handle and fit in the oven. If you definitely can’t fit them on the same baking sheet, that’s not a problem. The cooking time should be pretty much the same. You are correct though that you might need to broil them separately. I hope you enjoy them!
Hi, these look really good. Any suggestions if I want to finish them off on the gas BBQ grill instead of the oven? Thank you
Hi! You can definitely finish them on the grill. Get your grill to high heat to the point where you can’t really hold your hand over the grate for more than a few seconds. Then open the pouches, drain them, and carefully put the ribs on the grill. They should hold together ok, but they will be very tender and could break. Sear them on the grill until just crispy. I suggest putting a thin layer of sauce on after grilling rather than before so that the sauce doesn’t burn. Hope you enjoy!
Well! I am definitely glad I stumbled across this way to cook babybacks! I used my own dry rub and bbq sauce but these things fell off the bone, got raves from my wife and a buddy of mine that came down for the weekend! Good deal, this one’s getting book marked for sure!
I’m happy to hear that taking a risk on these ribs was worth it! Glad you, your wife, and friend enjoyed them! Thanks for sharing your experience.
Meat side up or down?
Meat side up!
Making this for the family tonight. Going to get my prep work started right now.
Oh, the naked bones on the plate at the end of the article was priceless!
Thanks for sharing
David Lee
Hi David! Please let me know how they turn out or if you have any more questions. Enjoy!
Ok I made your bbq sauce last night and just finished rubbing down the ribs and storing them in zip lock bags in the fridge until tomorrow. I am second guessing myself because I don’t think I got enough ribs to feed 25 people. I bought 7 full racks and also 6 half chickens at our local butcher shop but my hubby just told me he can eat a half rack by himself in which case I don’t think I bought enough… what do you think? Do you think I need to buy more or the combo of ribs and chicken will be enough?
Thanks
D
Between the ribs and chicken, I think you’ll be ok assuming you cut up the chicken. I’m one of those guys that can eat half a rack of ribs if that’s all I’m eating. It’s my experience though that even if a couple of people can eat half a rack, most people will just eat a 1/4 rack plus other food. This is especially true if you have some appetizers, side dishes, and other entrees. I made 3 full racks of ribs for 10 people along with a bunch of other food and we still had ribs left over. If all you have are ribs and chicken, you still might be ok, but it really depends on your guests and how they eat. If it’s concerning you, another 2 half chickens or a rack wouldn’t hurt. Don’t worry about the marination time – the recipe is very forgiving. I hope that helps!
Oh! One more thing… For that many people and with that much food, I would recommend at least a double portion of the sauce. In any event, cooking for that many people is tough, but it sounds like a fun time!
I made more sauce last night. I have about two and a quarter squeeze bottles full. I think that will be enough? I got up at 4:00 am to put the first batch of ribs in the oven. They are sitting in their little foil tents on the counter right now waiting to go in the oven. I can’t wait to try these babies. Decided to stick with what meat I got because I have to make the potato salad, baked beans and bacon maple syrup corn bread muffins. Oh yeah and the chickens too! Have a long day ahead of me. 🙂
-D
I made these for my husband’s birthday instead of a cake. He was a very happy man! Even the following week he was still going on about how great his birthday was! So, thank you! I will never do my ribs any other way!
A very Happy Birthday to your husband! So glad you enjoyed the ribs and thanks for taking the time to let me know!
Awesome recipe. Eben Awesomer lol ribs! Made them for my kids and the loved them!
Made these Memorial day weekend and will make them again tomorrow The best !!! Thanks for sharing!!!!
Awesome! Thanks for sharing.
2 am on July 4th, 2016, and I just took them out from the final step. I had to taste one before i put them away and, honestly, the absolute best I have ever tasted. Great recipe
That’s so great, Elizabeth! Happy 4th of July and thank you for checking out the recipe! Please let me know if you try anything else from the blog as well.
Absolutely delicious, I stopped eating to comment on this…
I couldn’t be more happier eating right now.
Thanks for interrupting your eating to share your thoughts! I’m happy you’re happy!
I have a rack of rids in the fridge right now and will prepare them this way for dinner tonight……this recipe sounds wonderful. I think I will get my husband to finish them off on the BBQ as he loves to cook outside this time of year! Thanks!
Please let me know how they turned out! Thanks for stopping by and trying the recipe!
After Google helped me find “the best ribs ever” I have to say hands down this will always be my go to recipe..loves how your bbq sauce absolutely complimented the smoky flavour of these fall off the bone beauties. Definitely worth 10 stars!
Wow! Thank you so much, Tanya! I really appreciate the kind words and I’m happy you gave my recipes a shot! So glad you enjoyed them!
This recipe looks awesome, I can’t wait to try!! Can I replace the baby back ribs and use spareribs the? If so, would I have to change anything in this recipe to better cook the same?
Hi Stephanie. If you mean St. Louis style spareribs, then yes you can use this recipe. The cook times should be pretty much the same. The St. Louis ribs will be meatier, but a little less tender than the baby back ribs. Just make sure to trim off the slab on the top side. You can cook the slab alongside the ribs in the same pouch, but take it off for more even cooking. If you mean Korean style spareribs, then I would probably suggest a different recipe. I hope that helps!
Thank you so much for this reply as well as the recipe! I literally just finished having ribs for dinner and had to thank you so much for sharing this!! It was so delicious and it fell right off the bone! And hubby def. Said this is one of his favorite meals I’ve made ;).
I kept it in the broil for like 3 minutes because I noticed in your notes it said it can catch on fire and that kind of worried me lol. For future cooking, any tips on how to handle that If it does catch on fire?
P.s. I did use the st. Louis style spare ribs and thanks to you I didn’t just throw the whole thing in the oven haha. It was easy to cut off the slab and extra meat around the ribs itself.
Thanks again! Completely delicious!! 🙂
I’m so happy this worked out for you, Stephanie! That’s great! Nice work trimming the St. Louis style ribs too. Regarding the broiler, it’s not that the ribs will catch fire, but the grease on the aluminum foil might. If you’re worried about it, just remove the ribs from the foil and place them directly on the baking sheet before broiling. You can also re-line the sheet with foil if you prefer. The key is just to dispose of the foil pouch if it seems like it could catch fire. In any case, even if the foil catches fire, just calmly pull the baking sheet out of the oven and place it on top of the stove. Usually you can blow the flames out. If not, then smother them with a pot lid, not water.
Can’t wait to eat these – they’re rubbed and sitting in the fridge now.
I made the beefy ones back in April as kind of my first homecooked meal in the new apt and they were SO AMAZING!
Wanted to do them again but with pork this time. Great that you already had a separate recipe!
The guy I’m dating flies back in in about 4 hours, so my plan is to get these bad boys in the oven, finish up my work from home day, pick him up, bring him home and dine him reallll gooodd hahaha
Thanks Sef!
I appreciate you coming back to try out another recipe. He’s a lucky man! Please let me know how they turned out!
how long would i cook 1lb of ribs for?
You should be fine with three hours.